An essential tool in any Salesforce admin's arsenal is the permission set, which allows administrators to grant specific permissions to users without modifying their basic profiles. While permission sets offer flexibility and fine-grained control over user permissions and access settings, manually assigning them can be time-consuming, error-prone, and, well, boring.
Luckily, at Drive Connect we know a thing or two about better living through Salesforce automation – we've figured out an easy, efficient way to handle license & permission set assignment with Salesforce Flow that we recommend to all our customers. And while the process outlined in that article is specific to Drive Connect setup, its basic principles can be applied to any situation where you'd like to leverage Flow's process automation features. Here, we'll take a look at the permission set side of that process, and break down everything you need to know about automatically managing user permissions with Salesforce Flow.
Profiles vs. Permission Sets
To understand why you'd want to automate permission sets in particular, it's useful to understand the difference between profiles and permission sets, Salesforce's two primary tools for managing user access:
Profiles are the broad foundation of user permissions in Salesforce. When a user is created, they are assigned a profile, which defines what they can see, access, and do within the organization. A profile controls permissions at the object, field, and record level, as well as access to various functionalities and features in Salesforce. A user's profile will generally represent their role in the organization; meaning that they're usually limited to a single profile assignment which doesn't change often.
Permission sets, on the other hand, are used to grant additional permissions to specific users beyond what their profile provides. They can be created and assigned independently of user profiles and provide additional privileges as needed; a user could easily have multiple permission set assignments and might cycle in and out of various permission sets as they move between projects or areas of focus. Simply put, permission sets are a more delicate tool than profiles, and admins will find themselves fiddling with them far more often.

Why Automate Permission Set Assignments?
Manually assigning permission sets to users can be a cumbersome process, particularly in large organizations with complex permission structures. Automating this process is a no-brainer for a few key reasons:
- Efficiency: Anyone who's had the experience of manually assigning or removing a permission set knows that the process is both slightly fussy and very dull – not the best use of your admin's time. By automating permission set management, administrators can save valuable time and redirect their efforts to tasks that require a little more brainpower.
- Accuracy: Manual permission set management is the exact kind of mind-numbing task that's easy for a human to slip up on – who among us can say that they've never clicked on the wrong tiny little checkbox in a Salesforce Setup screen?
- Scalability: Manual permission set management is one thing when your entire team fits in one conference room, but as your organization grows, it can get very unwieldy very fast.
- Security: Automatically assigning permissions according to a predefined set of objective criteria is simply much safer than leaving it up to your admin to field Slack requests for permission sets from every goofball in your organization.
How to Automate Permission Set Assignments with Salesforce Flow
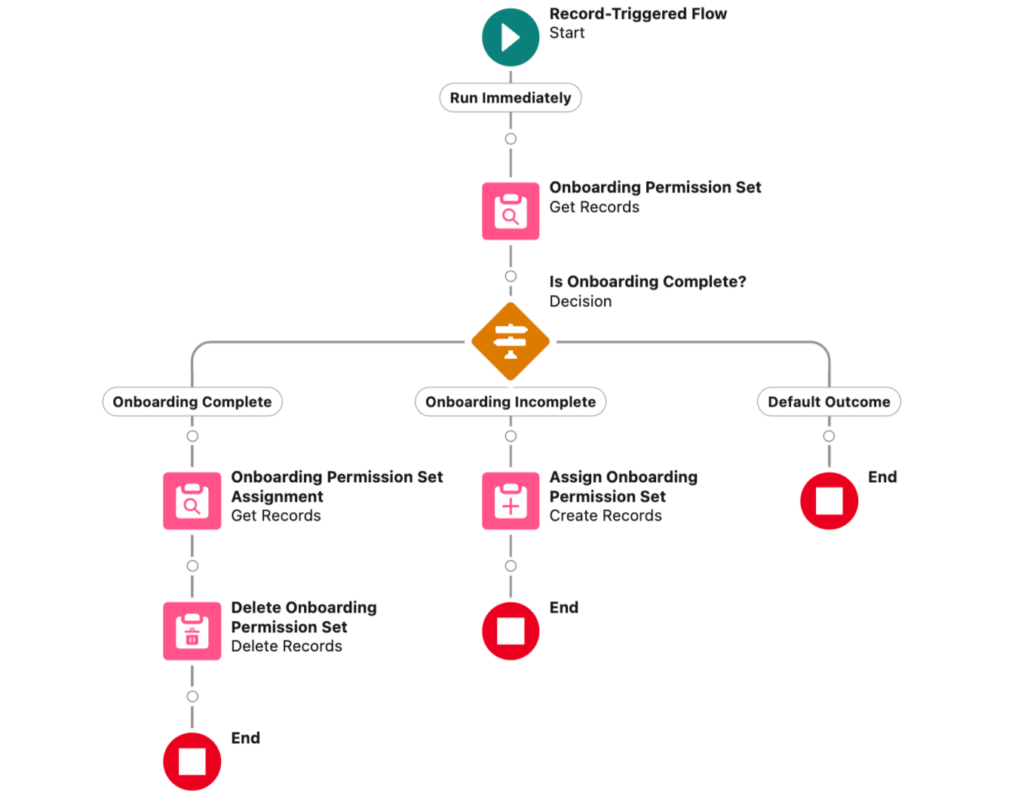
Now, let's take a look at how to use Salesforce Flow to perform a simple automation. Let's say you've built an onboarding module for new members of your organization – you'd like to assign them a permission set granting them access to the onboarding app when they join the company, and remove the permission set when they've completed their onboarding journey. We'll assume that there's an IsOnboardingComplete checkbox field on the User record that we can use to trigger the flow we're about to build. Let's do it:
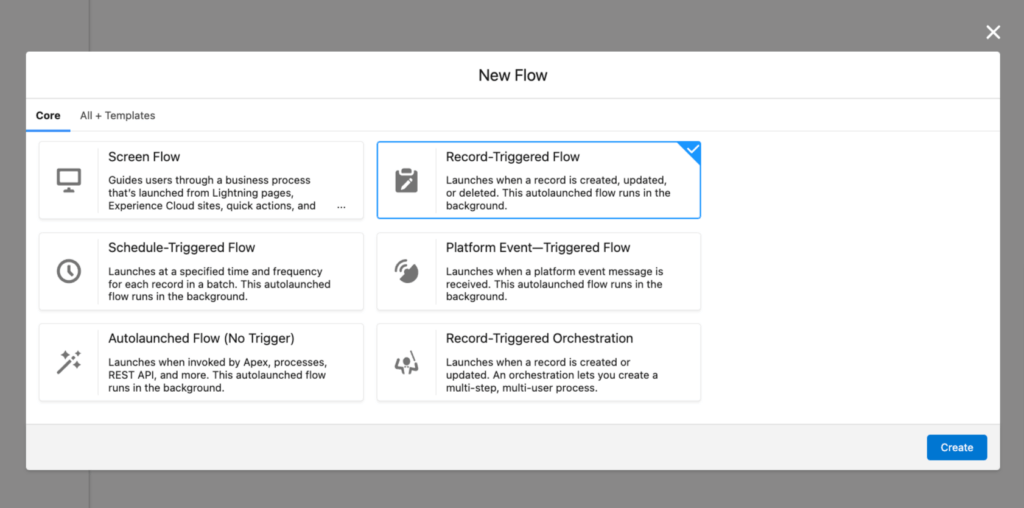
First, navigate to Setup > Process Automation > Flows and create a New Record-Triggered Flow.
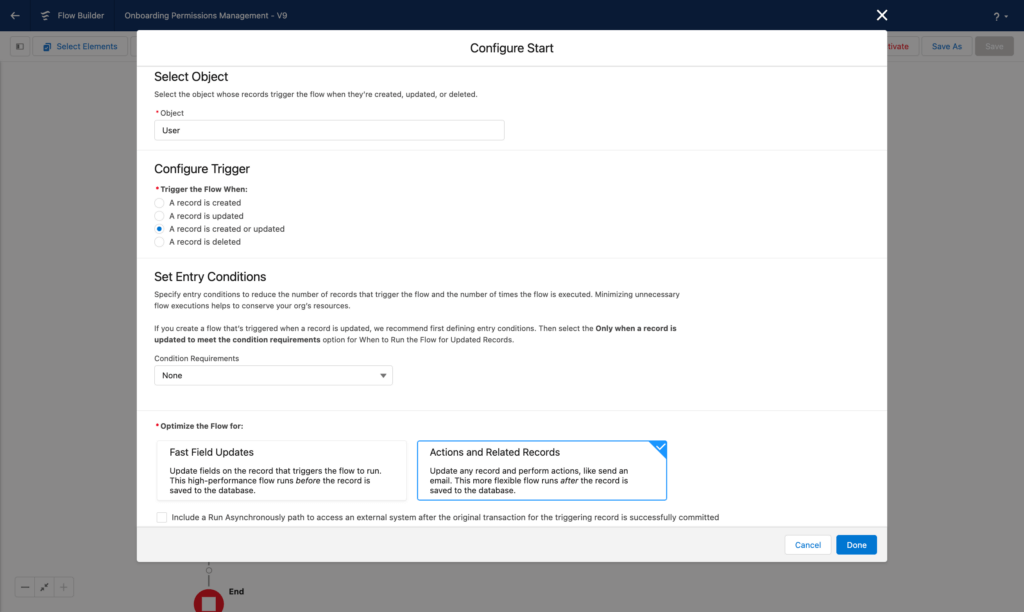
Configure the start of the flow:
- Object: User
- Trigger the Flow When: A record is created or updated
- Condition Requirements: None
- Optimize the Flow for: Actions and Related Records
This will tell the flow to run when a new user is created and when an existing user profile is updated.
Next, add a Get Records element to the flow. We'll use this to store the onboarding permission set record's field values in flow variables. Enter the following values:
- Object: Permission Set
- Condition Requirements: All Conditions Are Met (AND)
- Condition 1:
- Field: Name
- Operator: Equals
- Value: The API name of the onboarding permission set
- Sort Order: Not Sorted
- How Many Records to Store: Only the first record
- How To Store Record Data: Automatically store all fields
Now it's time for the fun stuff – we'll add a decision tree to tell the flow how to proceed depending on whether or not the IsOnboardingComplete checkbox on a user record is ticked. Name the first outcome Onboarding Complete and enter the following values:
- Condition Requirements to Execute Outcome: All Conditions Are Met (AND)
- Condition 1:
- Resource: {!$Record.IsOnboardingComplete__c}
- Operator: Equals
- Value: {!$GlobalConstant.True}
- When to Execute Outcome: Only if the record that triggered the flow to run is updated to meet the condition requirements
We'll use this to remove onboarding permissions from users that have completed onboarding. 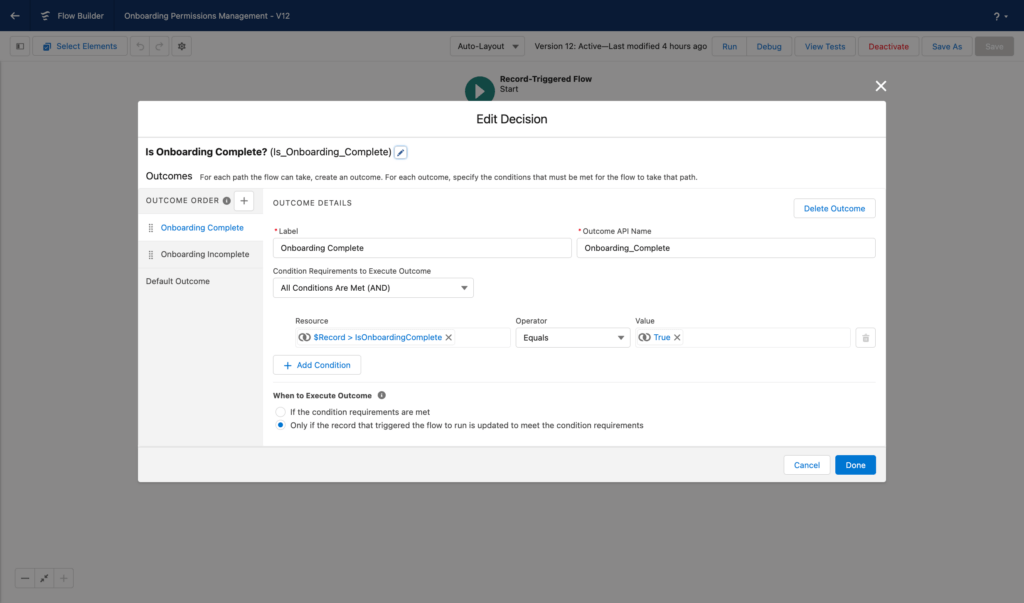
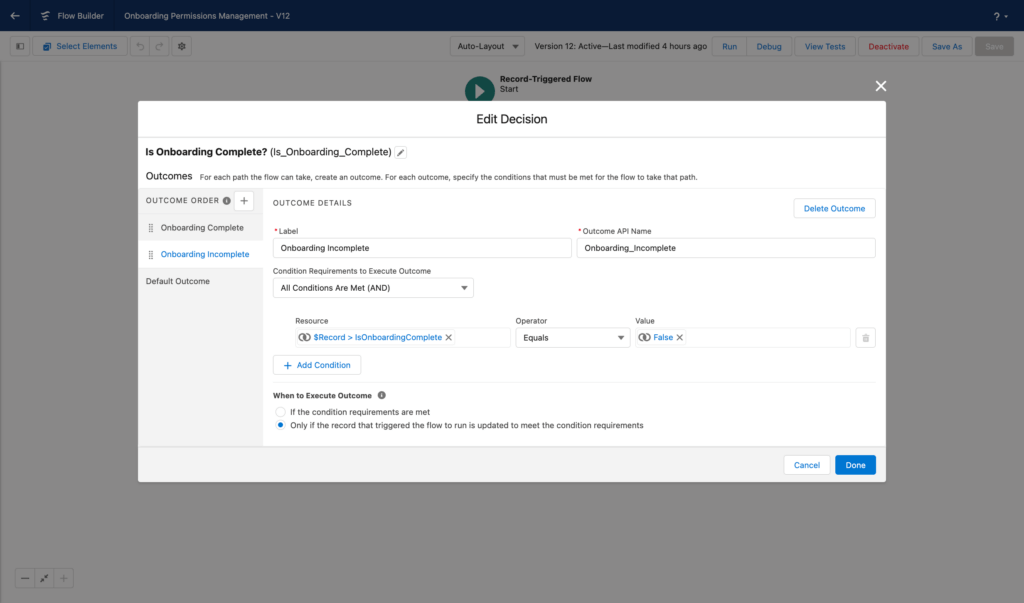
Next, create an Onboarding Incomplete outcome with the opposite conditions:
- Condition Requirements to Execute Outcome: All Conditions Are Met (AND)
- Condition 1:
- Resource: {!$User.Onboarding_Complete__c}
- Operator: Equals
- Value: {!$GlobalConstant.False}
- When to Execute Outcome: Only if the record that triggered the flow to run is updated to meet the condition requirements
We'll use this to add onboarding permissions to users that haven't completed onboarding.
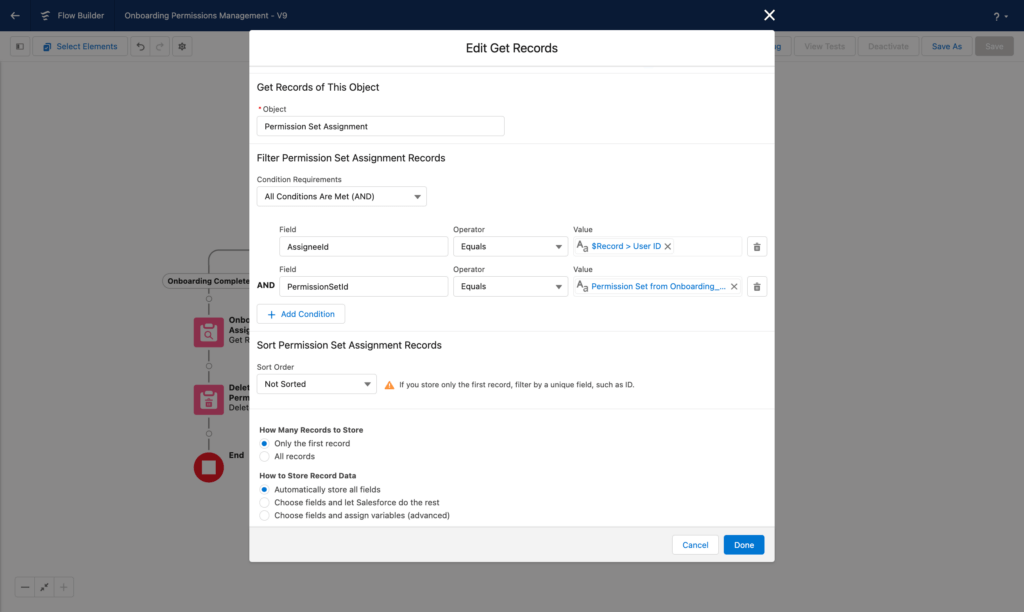
Now, we'll build out the branch that follows from the Onboarding Complete outcome. We'll need to add a Get Records element to the flow to store values from the onboarding permission set assignment record so that we can eventually delete it. Enter the following values:
- Object: Permission Set
- Condition Requirements: All Conditions Are Met (AND)
- Condition 1:
- Field: AssigneeId
- Operator: Equals
- Value: {!$Record.Id}
- Condition 2:
- Field: PermissionSetId
- Operator: Equals
- Value: {!Onboarding_Permission_Set.Id}
- Sort Order: Not Sorted
- How Many Records to Store: Only the first record
- How To Store Record Data: Automatically store all fields

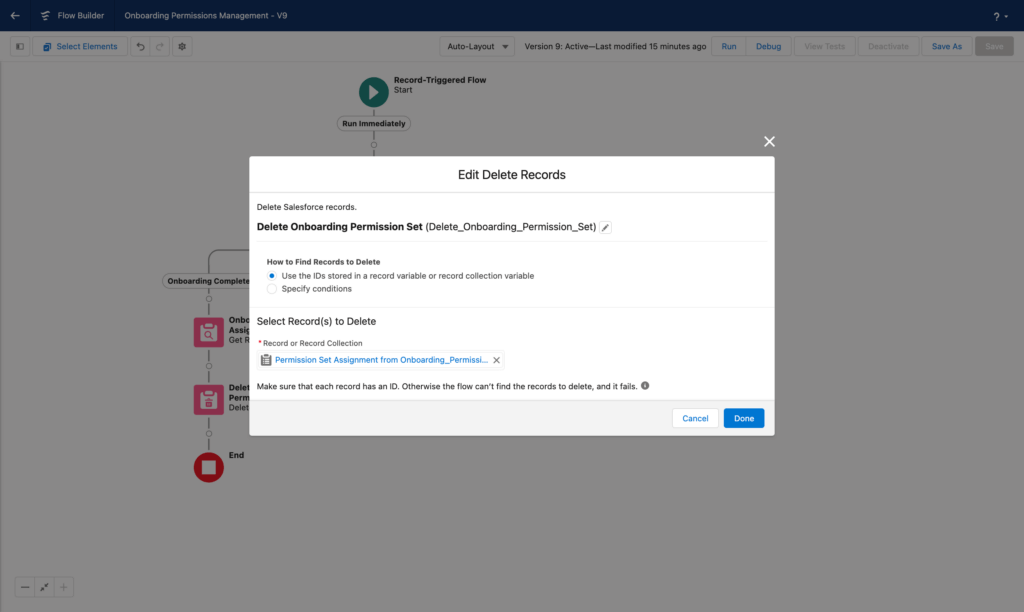
Next, we'll add a Delete Records element to the Onboarding Complete branch with these values:
- How to Find Records to Delete: Use the IDs stored in a record variable or record collection variable
- Record: {!Onboarding_Permission_Set_Assignment}
This will delete the onboarding permission set from the user record that triggered the flow.
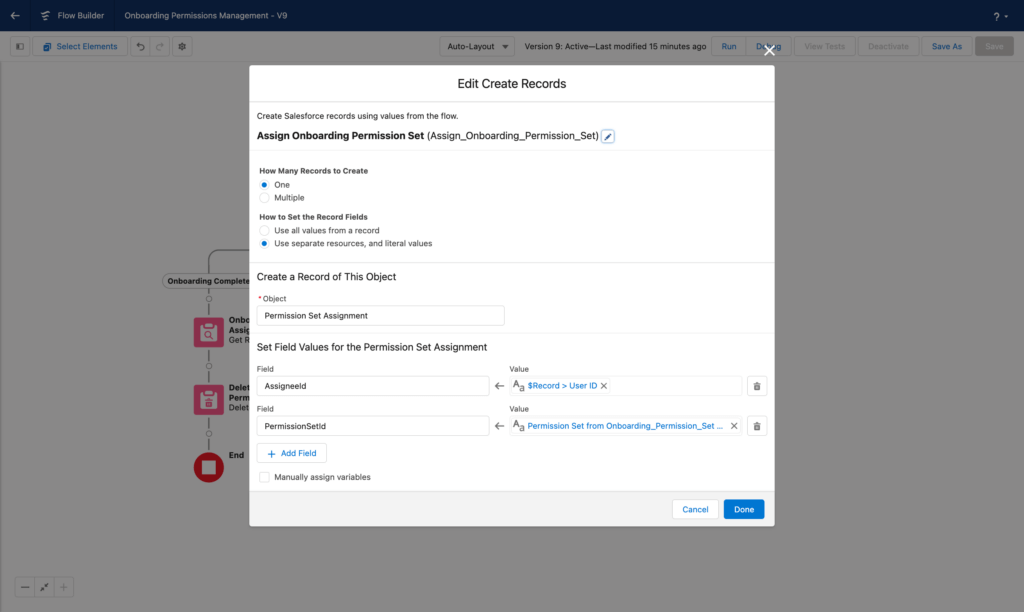
We're so close! Now it's time to add an Create Records element to the Onboarding Incomplete branch with these values:
- How Many Records to Create: One
- How to Set the Record Fields: Use separate resources, and literal values
- Object: Permission Set Assignment
- Field 1:
- Field: AssigneeId
- Value: {!$Record.Id}
- Field 2:
- Field: PermissionSetId
- Value: {!Onboarding_Permission_Set.Id}
This will add a onboarding permission set to the user record that triggered the flow.
Click Save and Activate and you're all done! Make sure to trigger the flow with a test user and check in on their assigned permission sets to ensure that your flow is working as intended before rolling it out to a wider audience. Here's what the finished product should look like:
Remember, this is a pretty basic flow tree, but you can use Salesforce to create powerful, intricate flows that are as complex as your business demands – the sky's the limit.
And if this post has given you the automation bug, you're in the right place. We're the creators of Drive Connect, an easy-to-use Salesforce app that sets up in minutes and allows you to seamlessly integrate Google Workspace functionality into your existing Salesforce workflow. It's packed with a powerful suite of automation features designed to take repetitive tasks off your plate and give you your time back. Try it for yourself with a free two-week trial – no credit card required.
Automate Your Workflow with Drive Connect
You can use the app for 14 days with no credit card required.