It is no secret that automation is a powerful tool in the realm of Salesforce. Automating repetitive tasks with Salesforce Flow is a massive time saver that ensures consistency in your workflow. Some of the most practical flows you can build with this tool are based around email. There are dozens of use cases for automated emails, which you can utilize across objects like opportunities, orders, cases, and more. For now, our focus will be on leads. Automatically emailing new leads ensures consistent communication and simplifies the process of converting them into opportunities. So, let's learn how to send an email with Salesforce Flow by creating a flow that automatically emails new leads to request a meeting.
Send an Email Using Salesforce Flow
Part 1: Configuring the Trigger
- Navigate to Setup.
- In the search box, type flows and go to the Flow page. Choose New Flow in the top right corner.
- We will create a Record-Triggered Flow, meaning that when a record is created or updated, this flow will automatically run.
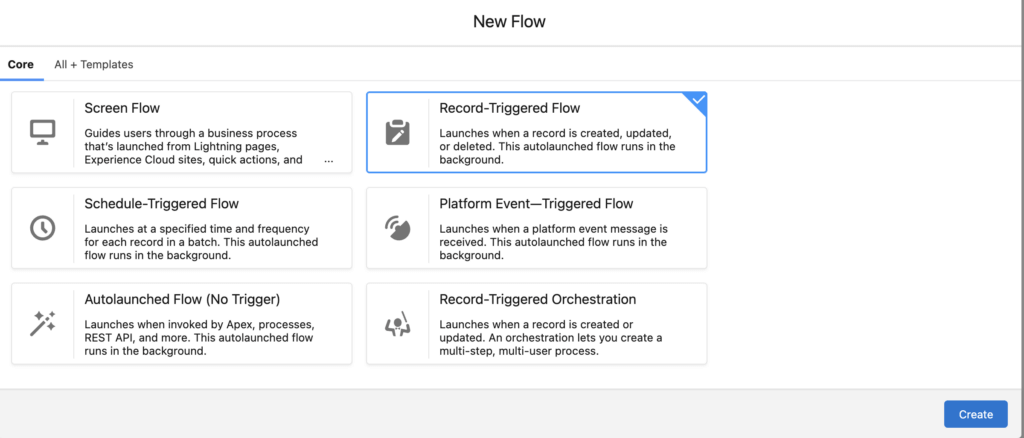
- Select the Lead object.
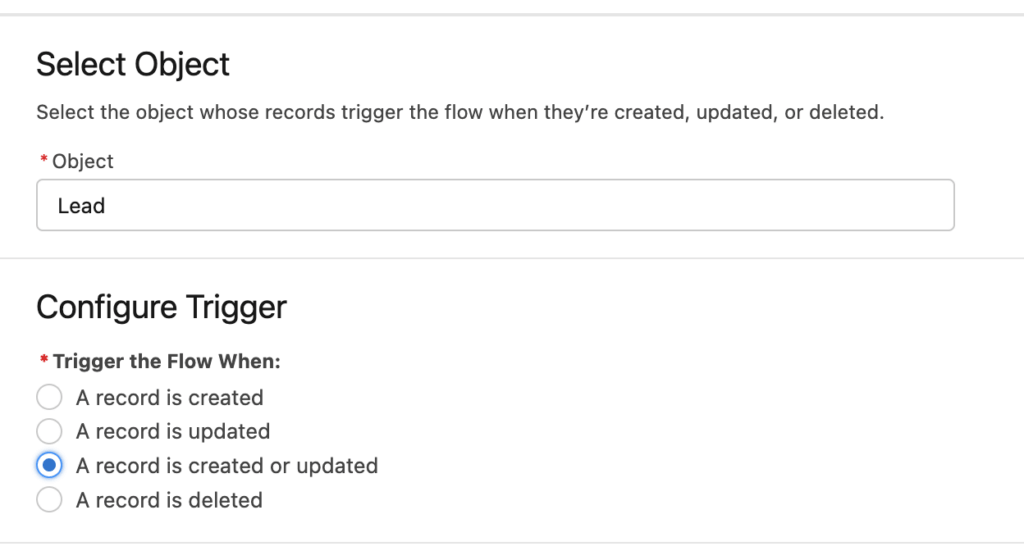
- Next, we determine when we want our flow to trigger. For this example, select Trigger a flow when: A record is created or updated. Now, every time a new lead is created or updated to meet certain conditions, the flow will trigger and email the lead.
- Set entry conditions. From the drop-down menu, select All conditions are met (AND), meaning that all the conditions must be met for our flow to run.
- Add conditions. These will depend on what object you are working with, but we will use FirstName, LastName, and Email for the lead object. Use the drop-down menus to select the operator for each of these as Is Null and the values as False. This ensures that the flow only affects records with a value for all of these fields.
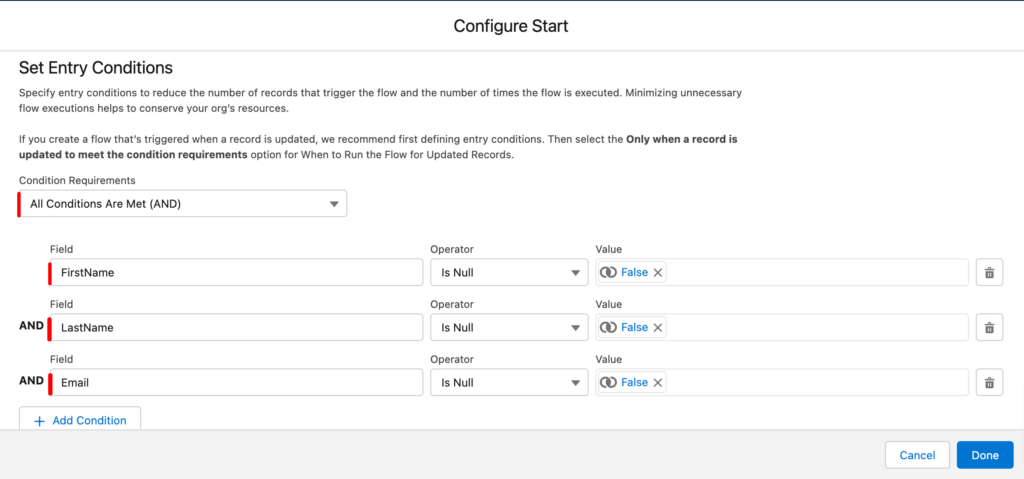
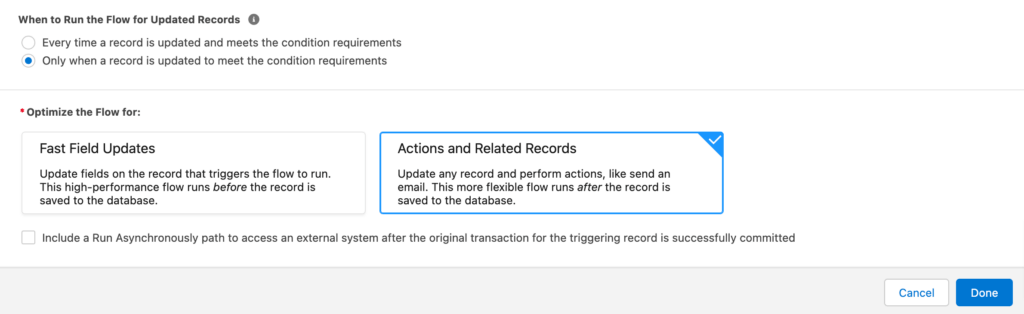
- Under When to Run the Flow for Updated Records, we want to select the second option: Only when a record is updated to meet the condition requirements. This way, the email is only sent when a new lead is created or an existing one is updated to contain a name and email address.
- Optimize flow for actions and related records and select Done.
Nice! You just created the trigger for your flow! Now that we've set the conditions to start our flow, let’s configure what we want it to do.
Part 2: Creating the Action
- Back at the Flow Builder page, hover to reveal the (+) icon below the Start Trigger Flow button.

- From the module, under Interaction, select Action.
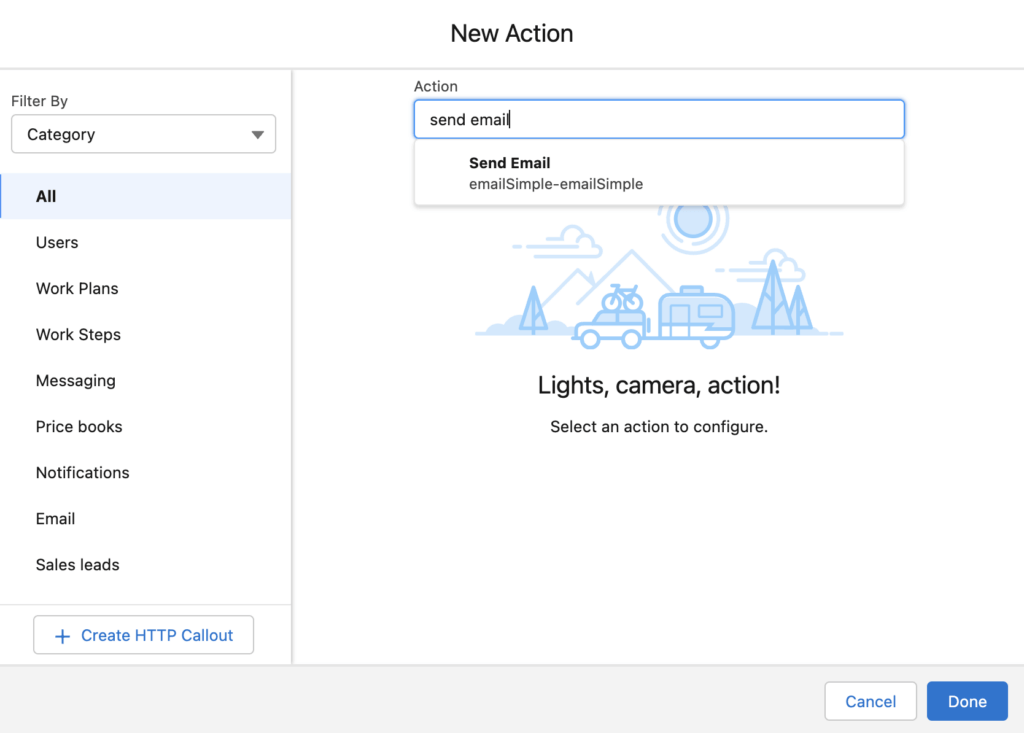
- In the Action search box, type send email and choose Send Email.
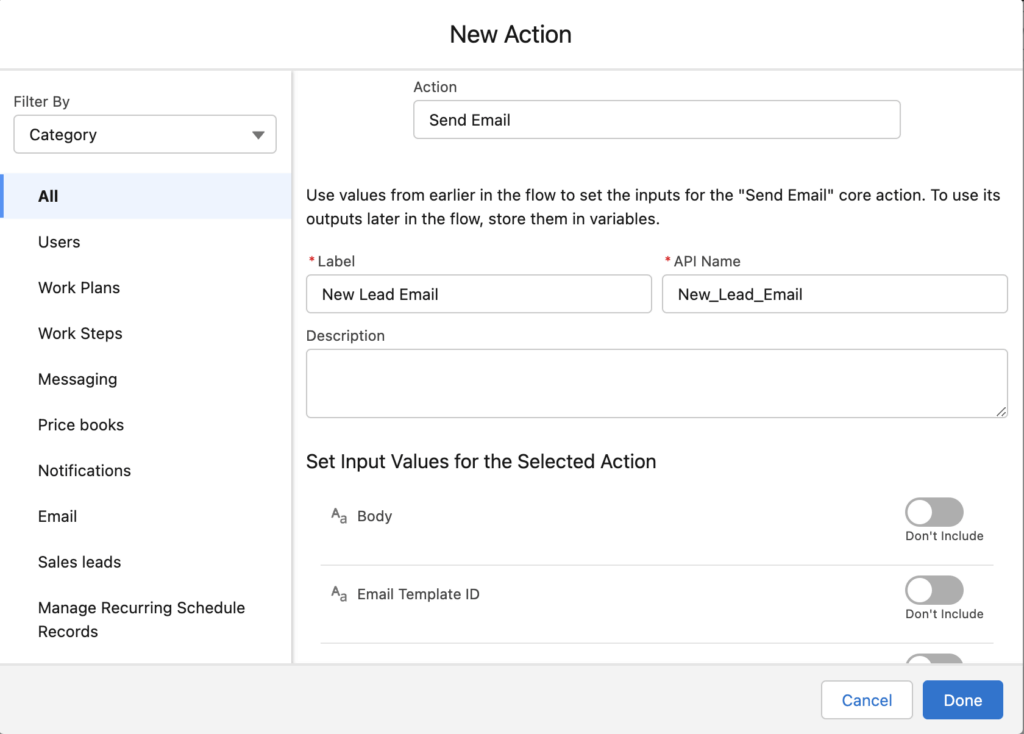
- Name the action. In this case, we will just go with “New Lead Email.” The API name will autofill.
Part 3: Setting Input Values
- Write the email. When it comes to drafting the content of your email, you have three available options:
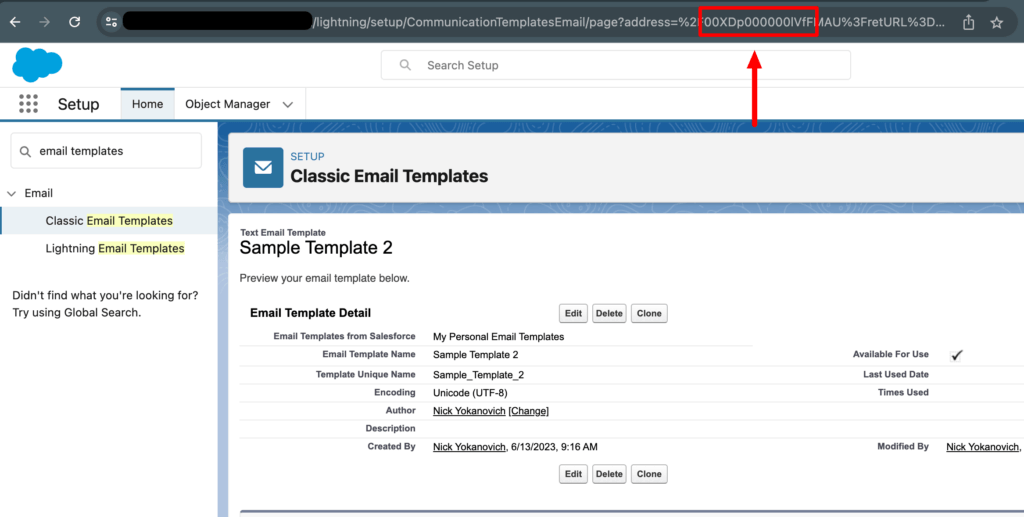
Option 1: As of Salesforce's Summer ‘23 release, you can use email templates with the Send Email action. You can do this by toggling Email Template ID to On and entering the ID of the email template you want to use. To find this ID, navigate to your email template from the Lightning Email Templates in your apps or the Classic Email Template page in setup. Then copy the 15-character string from the URL and paste it into your flow as the Email Template ID.
 Option 2: Store the body of your email in a text template. To do this, toggle the Body switch On. Next, select New Resource from the menu and choose Text Template. Give the template an API name and type the body of your email. You can enter custom resources from the menu above the text box. This way, you can include both static text and personalized information for the lead. Once your template is complete, click Done.
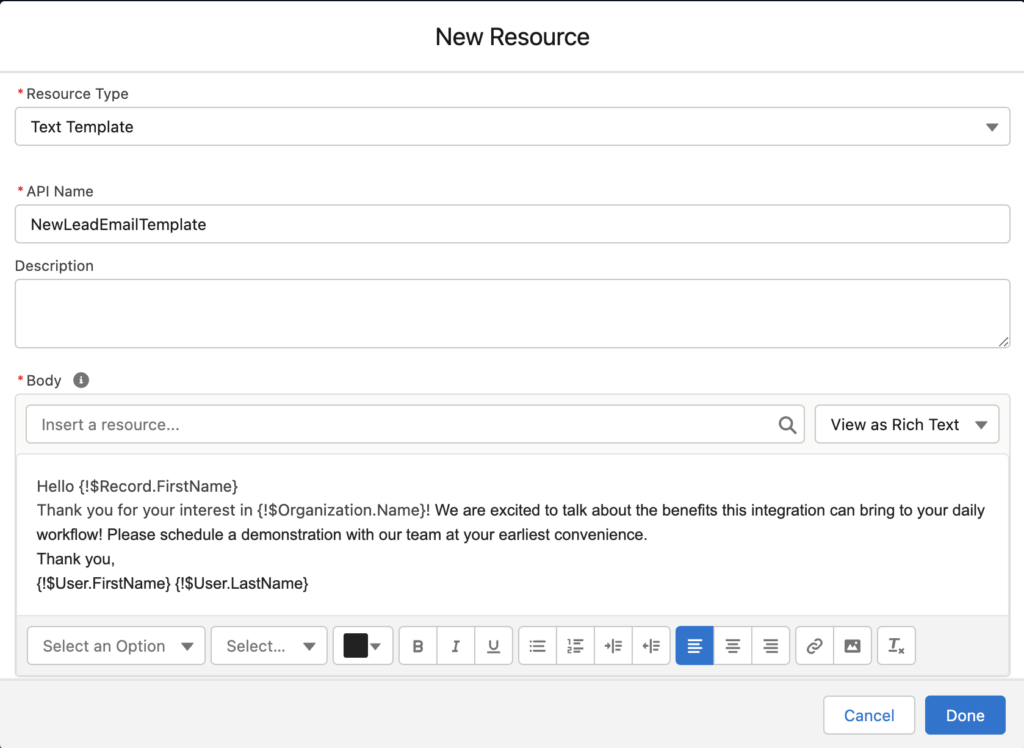 Option 3: Type the entire body of your email in the single-line body input (please don't do this).
 - Now that we have the content of our email written, it’s time to determine who it is going to. Toggle the recipient list On and enter {!$Record.Email}. Now, the email address tied to the Lead object will automatically become the recipient.
- Another new feature of the Summer ‘23 release of Salesforce is the ability to log emails sent with the Send Email action. This means you can automatically update records when an email is sent, so you have a clear timeline of communication stored directly within the object record. To do this, toggle the Log Email on Send option On and set the value as {!$GlobalConstant.True}.
- Toggle Recipient ID to On and enter {!$Record.Id} Now, the recipient record will automatically update to show when they were contacted, what the email said, and even when they opened it.
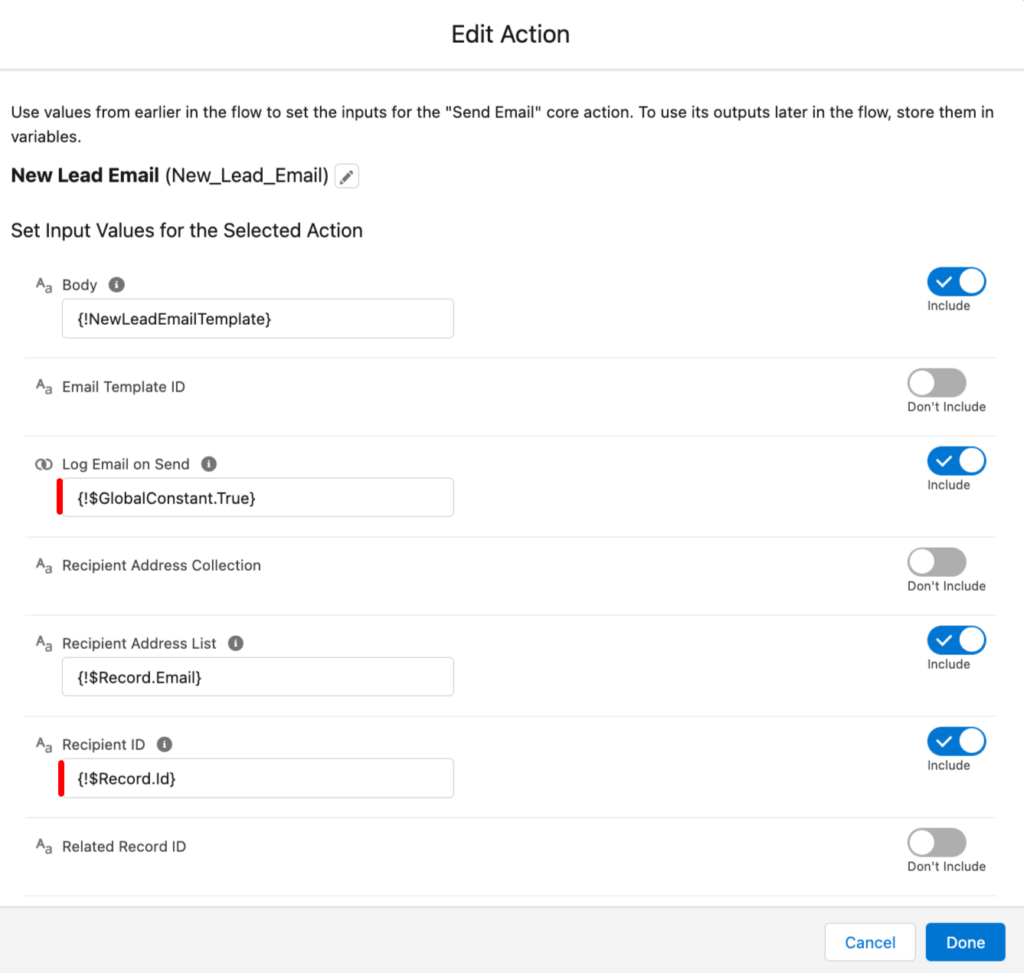
- Next, toggle Rich-Text-Formatted Body On. From the drop-down menu, select {!$GlobalConstant.True}. This ensures our email formatting remains consistent.

- Last, toggle the Subject value to On and type your subject in the box. You can skip this step if you are using an Email Template ID.
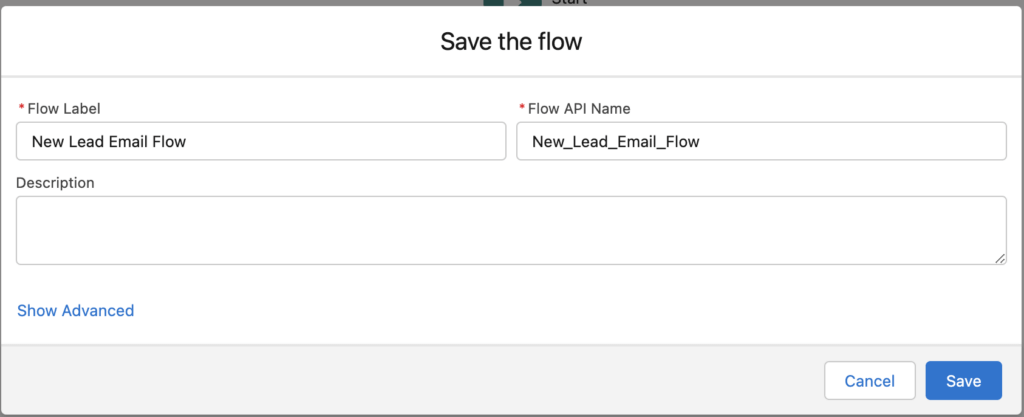
- Click Done, and once back in the Flow Builder screen, select Save in the top right corner, give your flow a name, Save, and then from the Flow Builder page, Activate.
Congratulations! You just created an automated email flow! Remember, this is just one possible use case to send an email with Salesforce Flow. Consider the scenarios where your organization repeatedly sends near-identical emails, and use what you learned here to simplify that process into a flow!
Troubleshooting
If your test flow emails aren't reaching their recipients, you'll want to double-check your deliverability settings. To do this, navigate to Setup > Email > Deliverability and make sure that your Access to Send Email level is set to All email.
If your deliverability settings look good, go to Setup > Email > Test Deliverability to check whether your recipients are blocking any of the IP addresses Salesforce uses to route emails.
Do More with Automation in Salesforce
Sending emails with flow just scratches the surface of possible automation within Salesforce. If you want to explore more with automation, check out Drive Connect– The easy-to-use Google Drive and Salesforce integration that lets you take automation to the next level with automated folder structure and document generation. It installs in just a few minutes, and you can try it free for 14 days with no credit card required.
Automate your workflow with Drive Connect
Try Drive Connect free for 14 days- no credit card required.