Need to set up Salesforce Files Connect for Google Drive file linking? We'll walk you through the process, but we're not going to lie to you – it's going to take a while. So before we jump into things, let's go over a few limitations of Files Connect.
Salesforce Files Connect/Google Drive Limitations & Gotchas
- Salesforce Files Connect doesn't work with Google Shared Drives. You can use it to view and share individual files that have been shared with you, but you can not access Google Shared Drives with Salesforce Files Connect.
- Edits made to files stored via Copy in Salesforce will not update the original file in Google Drive.
- Files Connect doesn't support uploads to Google Drive from within Salesforce. To add a file to your Drive tab in Salesforce, you'll need to do it from Google Drive.
If any of these are dealbreakers for your organization, spare yourself the wasted afternoon and consider a different solution. We humbly suggest our own Drive Connect app, which supports Shared Drives, direct file uploads from within Salesforce, and other Drive features that Files Connect doesn't play well with.
Deep breath. Still with us? Okay – let’s dive in to the Files Connect setup process.
Enabling Files Connect
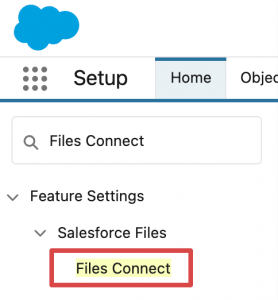
First, you’ll need to enable Files Connect for your org. In Setup, go to the Quick Find bar and search for Files Connect.
In Files Connect Settings, click Edit and select Enable Files Connect. Next, select an option from the File Sharing picklist.
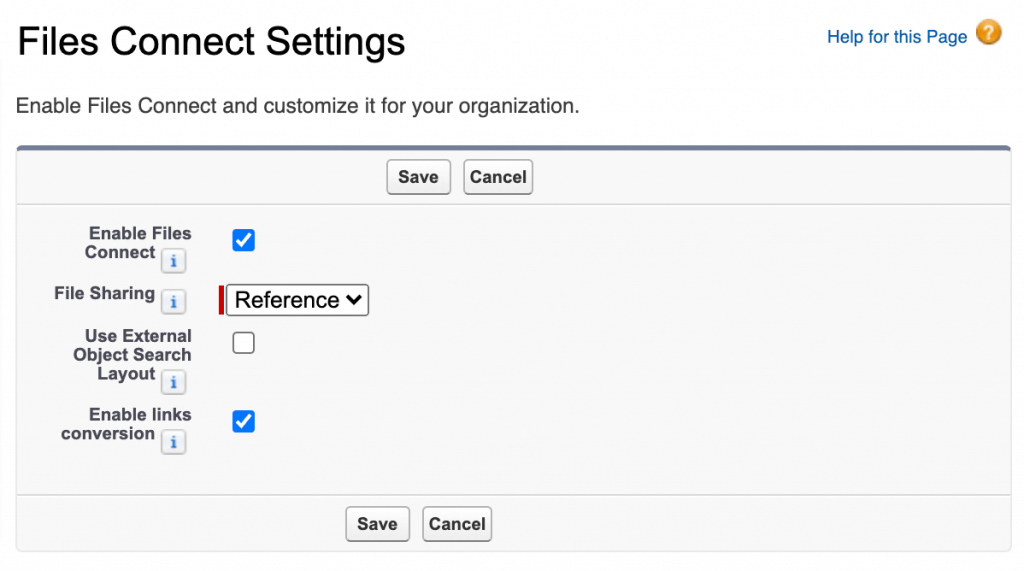
You’ve got two choices here: select Copy to make a copy of your external files in your Salesforce org, or choose Reference to simply add a link to the external files from Salesforce.
- Copy files will behave like native Salesforce documents – you’ll be able to preview and share them with external collaborators without having to worry about their access to your Google Drive environment.
- Reference files won’t be available for preview within Salesforce, and users will need access to the file via Drive in order to view it. This is the better option for organizations that wish to maintain their Google Drive security settings across all modes of access.
Creating an Authentication Provider for Google Drive
In order to use Google Drive as an external data source for Files Connect, you’ll need to create an authentication provider in Salesforce.
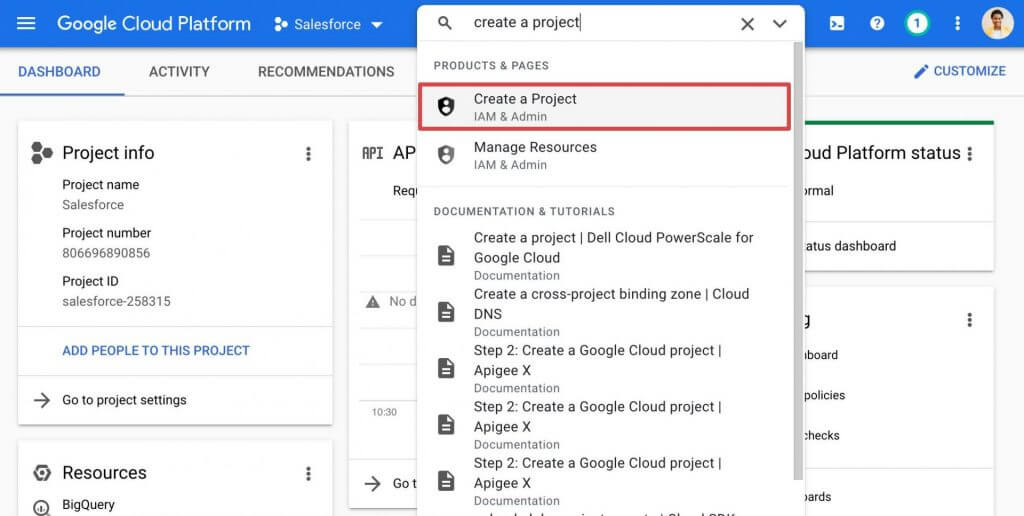
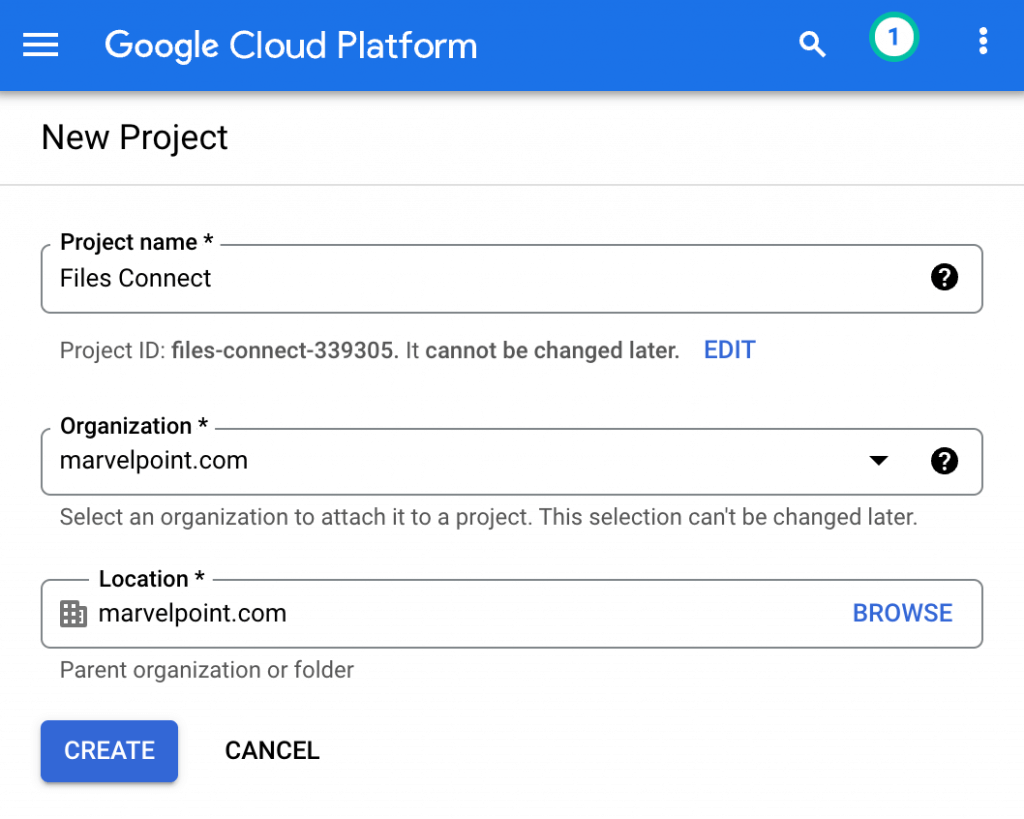
First, head over to the Google Developers Console and create a new project. Search for Create a Project in the global search bar and select the first result.
Give your project a name and select Create to get started.
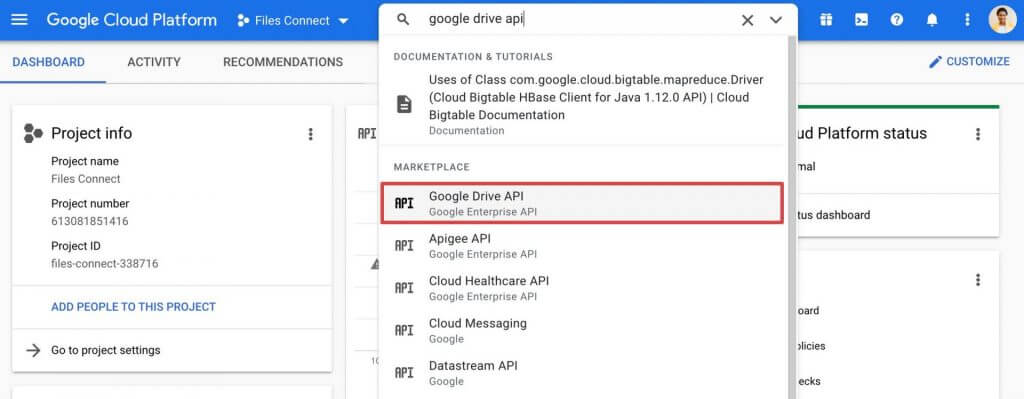
From the global search bar in your project dashboard, find and select Google Drive API. Click Enable API to activate it for use with your project.
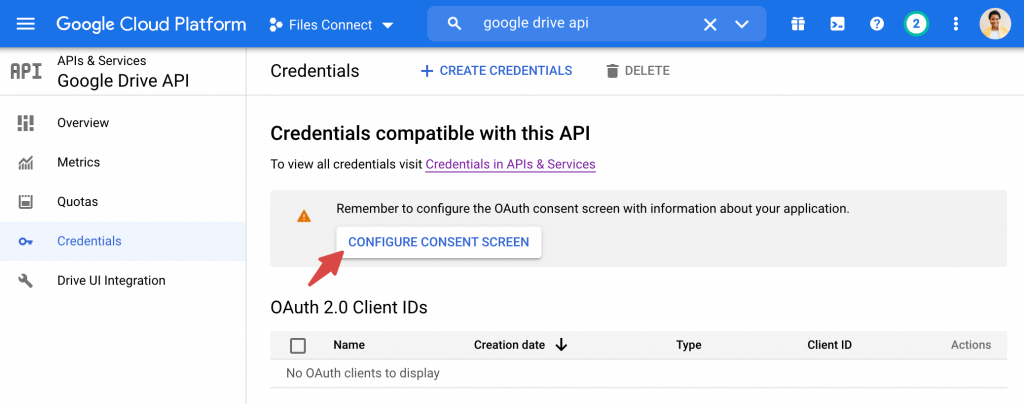
Navigate to Credentials in the Google Drive API dashboard and click Configure Consent Screen. This is the interface your users will use to connect their Salesforce orgs with their Google Drive accounts.
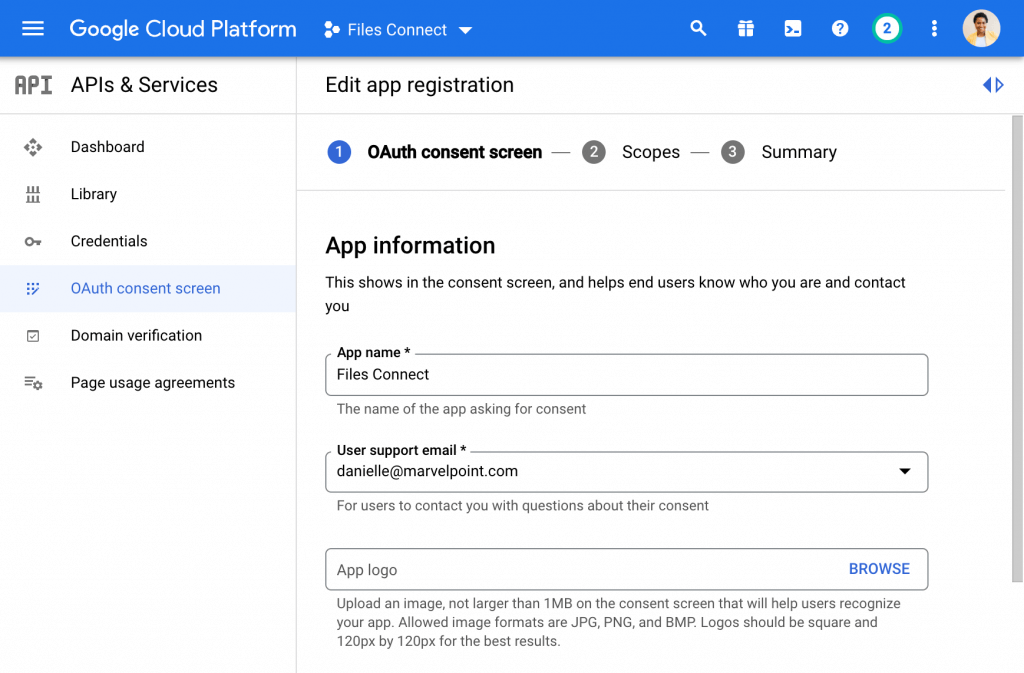
Enter an app name – "Files Connect" works nicely – and a valid email address for the User Support Email and Developer Contact fields. You don't need to complete the rest of the app registration wizard to get up and running with Files Connect; go ahead and click through it.
Return to the Credentials tab, click Create Credentials, and select OAuth client ID.
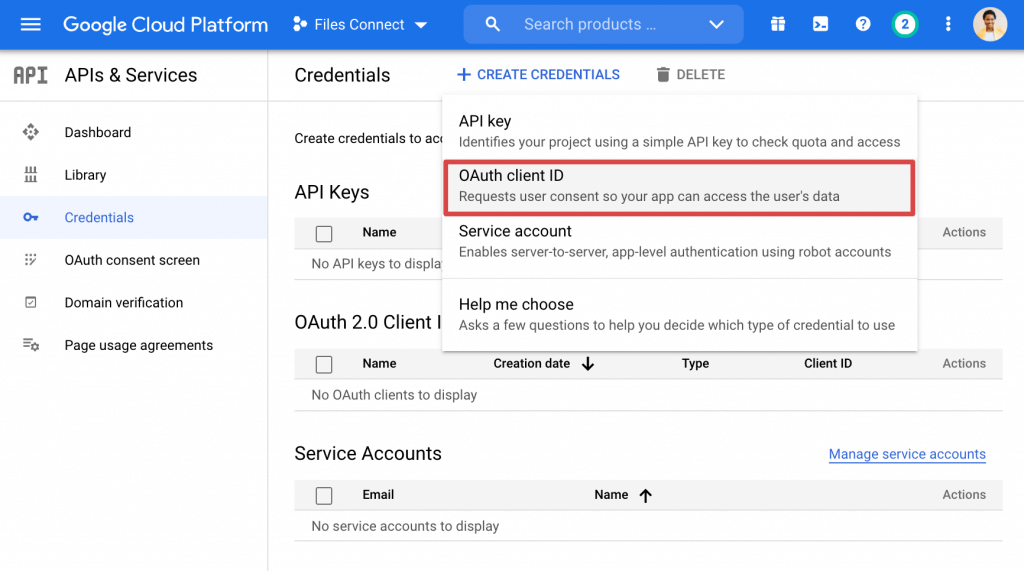
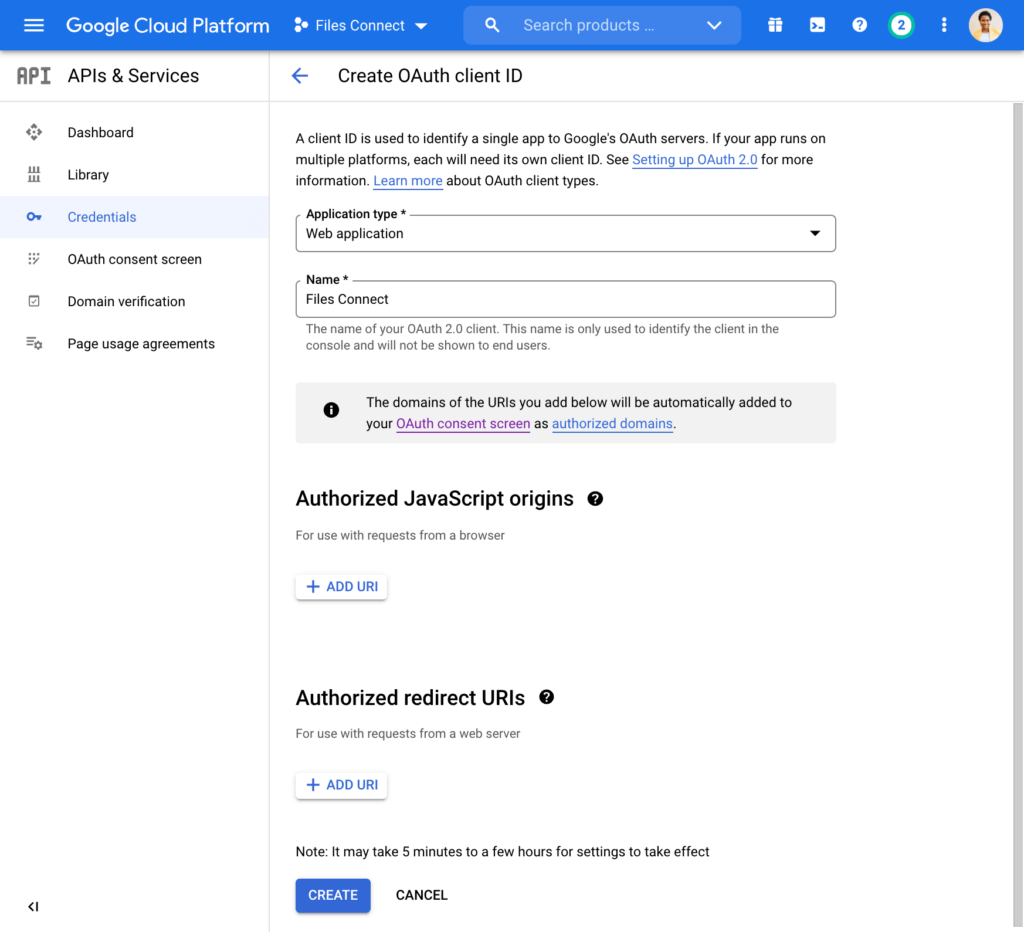
From there, select Web Application, give your application a name, and click Create. You'll return to this tab later to complete setup of your authentication provider.
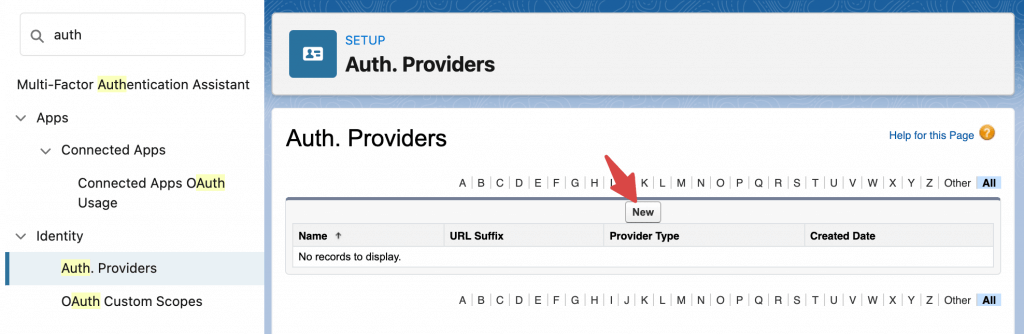
Take note of the credentials you've just created and head back over to Setup in your Salesforce org. Find Auth. Providers with the Quick Find bar and select New.
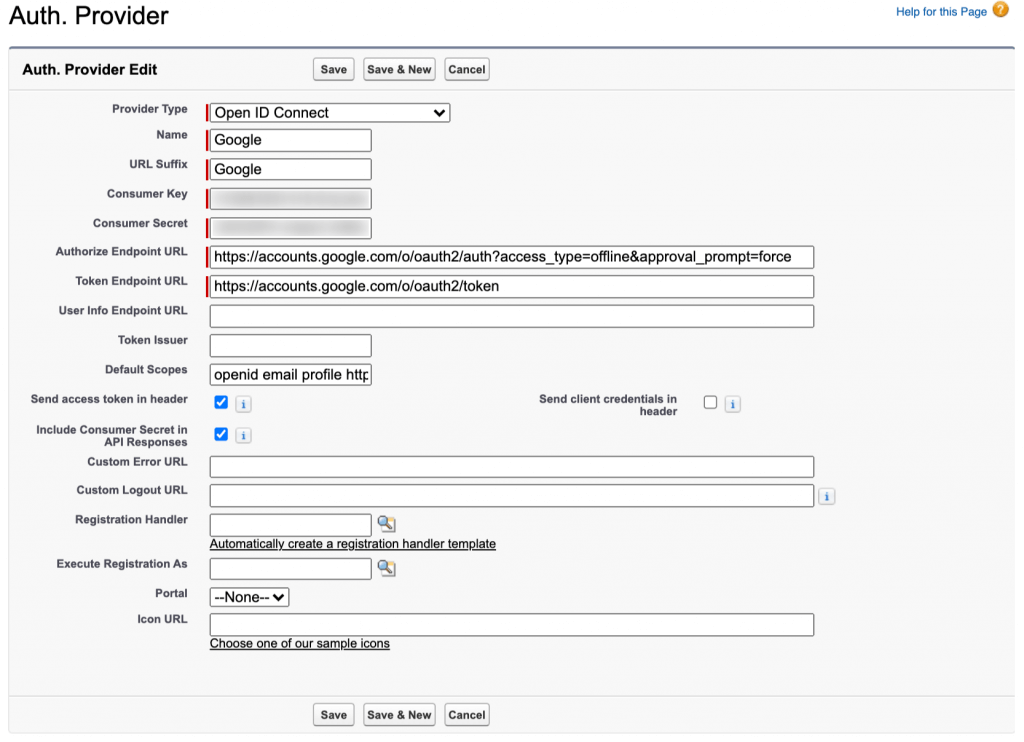
Give your new Authorization Provider the following settings:
Provider Type: Open ID Connect
Name/URL Suffix: Your choice – whatever you choose will be visible to users.
Consumer Key: The Google OAuth Client ID you just created
Consumer Secret: The Google OAuth Client Secret you just created
Authorize Endpoint URL: https://accounts.google.com/o/oauth2/auth?access_type=offline&approval_prompt=force
Token Endpoint URL: https://accounts.google.com/o/oauth2/token
Default Scopes: openid email profile https://www.googleapis.com/auth/drive
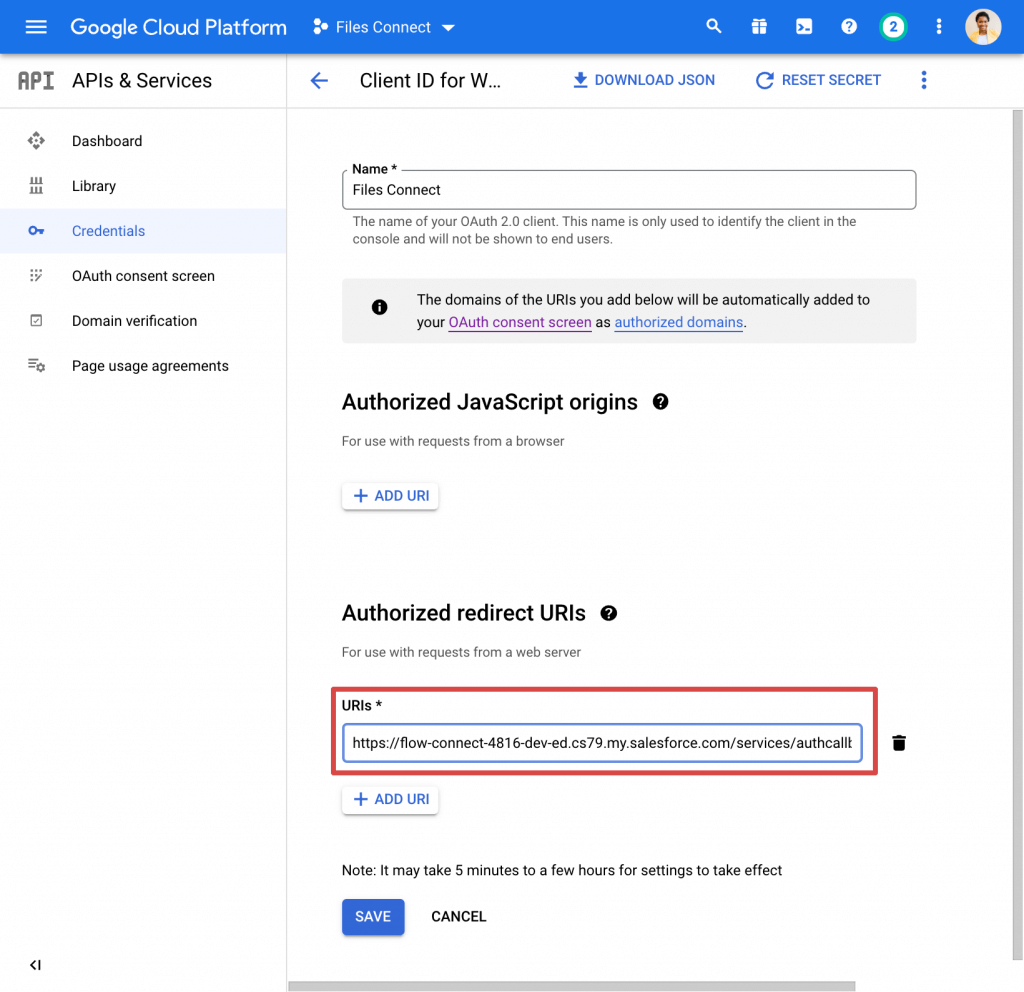
Click Save and find the Callback URL that appears at the bottom of your new Authorization Provider's detail page. Copy the URL and return to your project in the Google Developer Console.
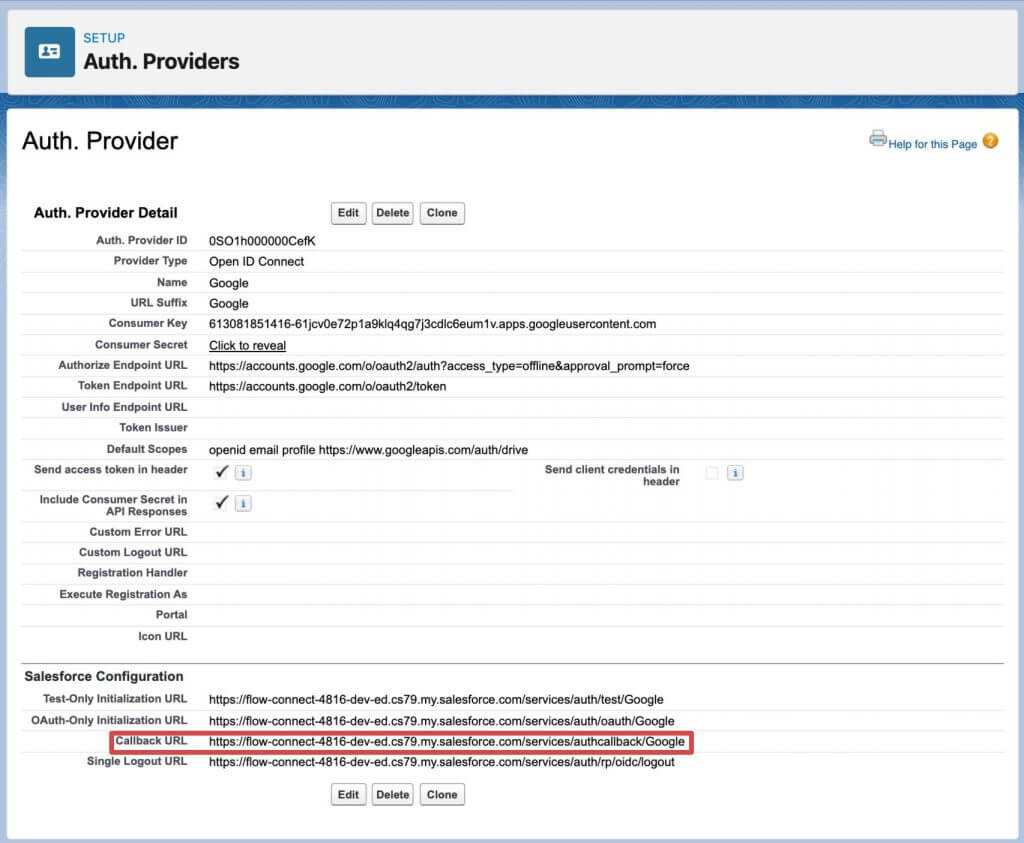
In the Credentials tab, click on the app you created under OAuth 2.0 Client IDs and add your Callback URL to the Authorized Redirect URIs section of its detail page. Click Save.
Defining Google Drive as an External Data Source
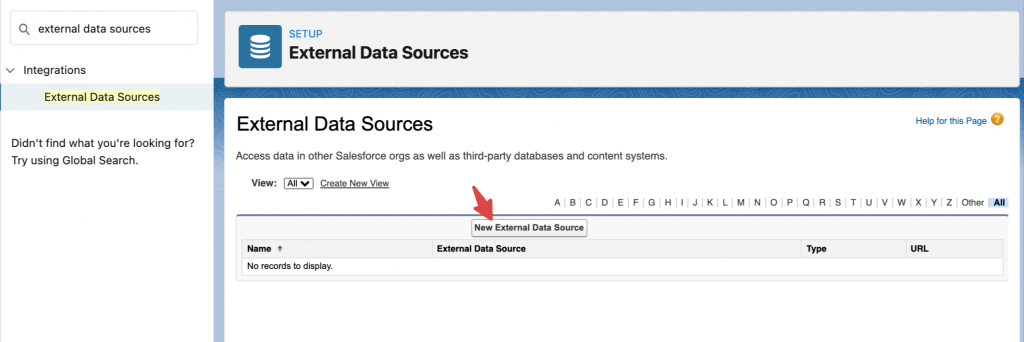
In order for Drive files to show up in your Files tab, you'll need to define Google Drive as an external data source in your Salesforce org. Find External Data Sources in the Quick Find bar and select New External Data Source.
Give your new external data source the following settings:
External Data Source/Name: Again, this is your choice – it'll be visible to users, so choose something simple and useful. We went with "Google Drive."
Type: Files Connect: Google Drive
Identity Type: Per User
Authentication Protocol: OAuth 2.0
Authentication Provider: The Authentication Provider you created in the previous step
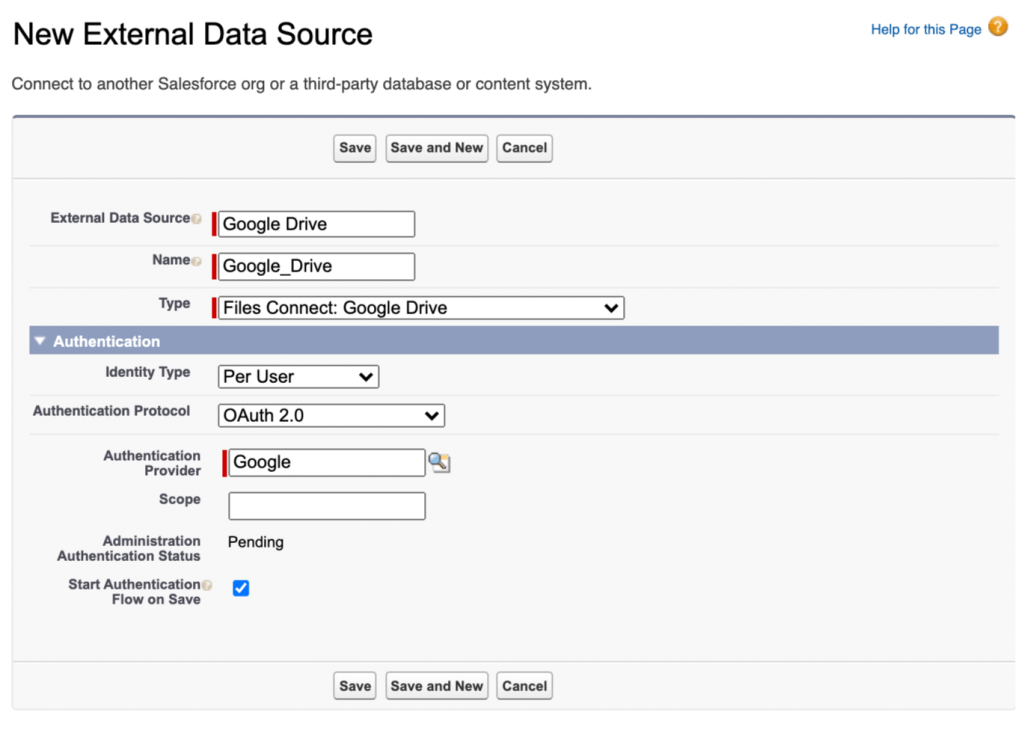
If you're interested in testing your user authentication experience, select the Start Authentication Flow on Save checkbox. This will take you through the same Google OAuth process individual users will complete to connect to their Google Drive accounts.
Managing User Permissions for Salesforce Files Connect
As with most Salesforce tools, user access to Files Connect can be managed via both Profiles and Permission Sets. We'll walk you through both options.
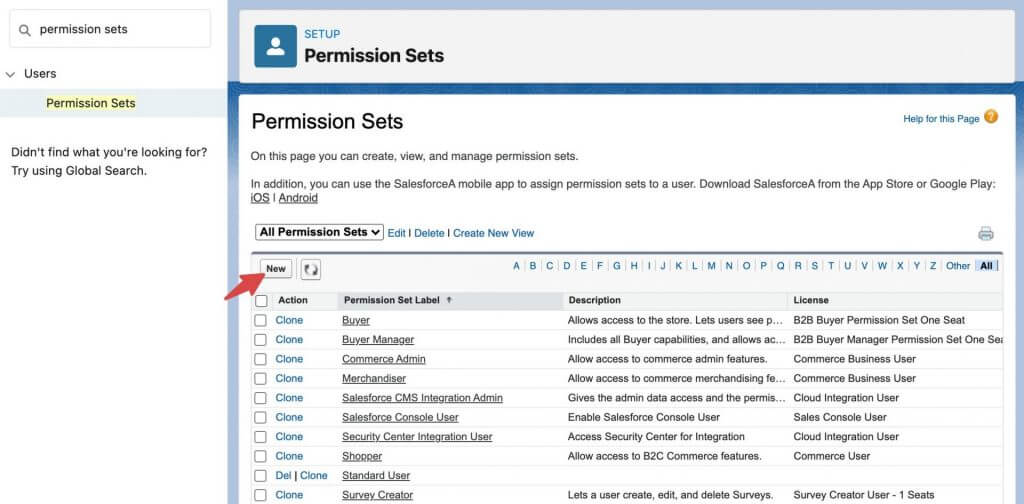
Managing Files Connect Access with Permission Sets
To grant access to Files Connect via Permission Sets, find Permission Sets in the Quick Find bar. Click New to create a new permission set for Files Connect users, or select an existing permission set to upgrade with Files Connect access.
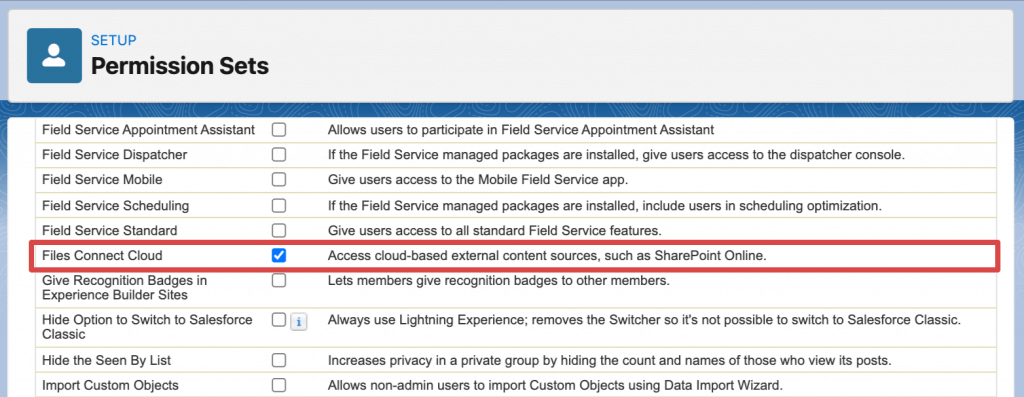
To manage Files Connect permissions, scroll all the way to the bottom of your selected permission set's detail page and select System Permissions.

Click Edit and find Files Connect Cloud in the list of system permissions. Select it and click Save.
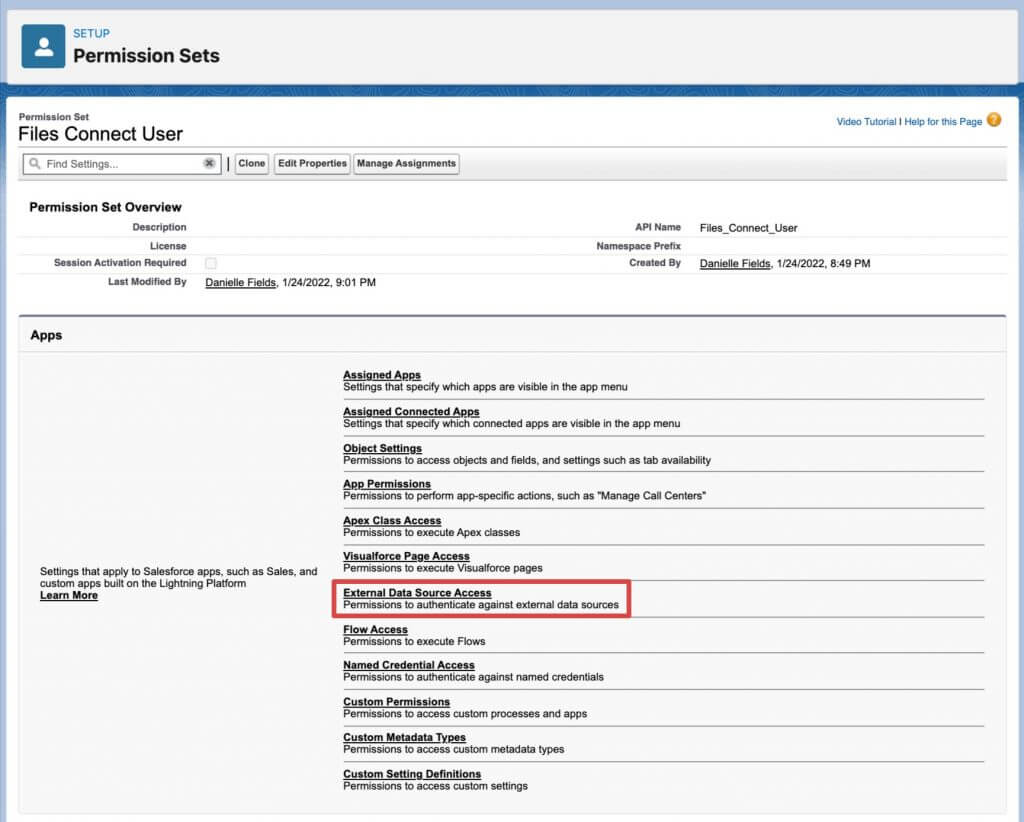
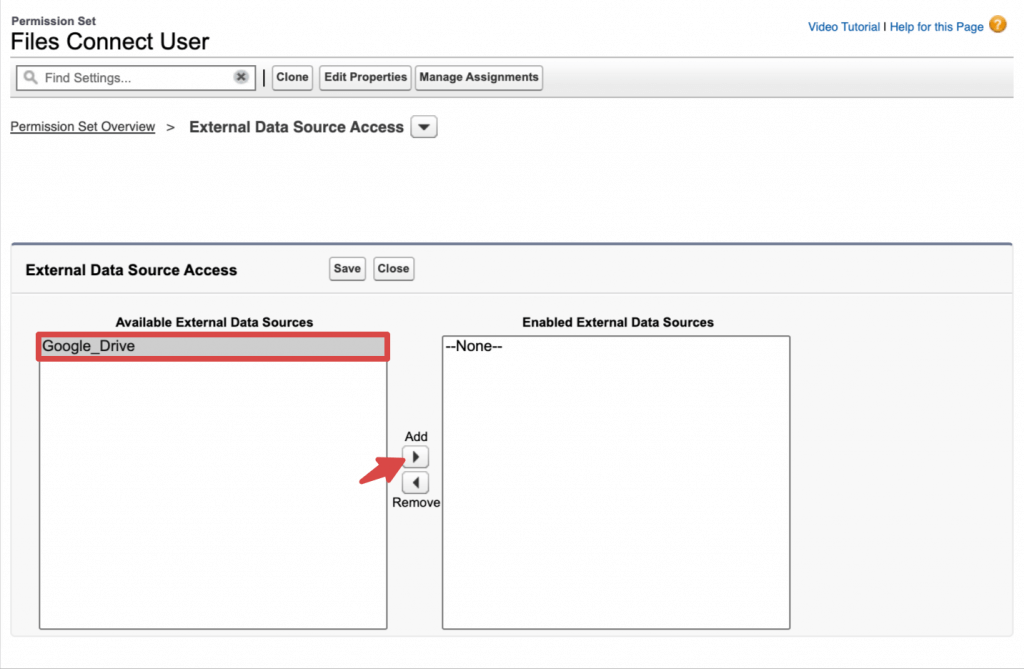
Return to your permission set's detail page and select External Data Source Access in the Apps section of the page.
Click the Edit button to select from your org's available external data sources.
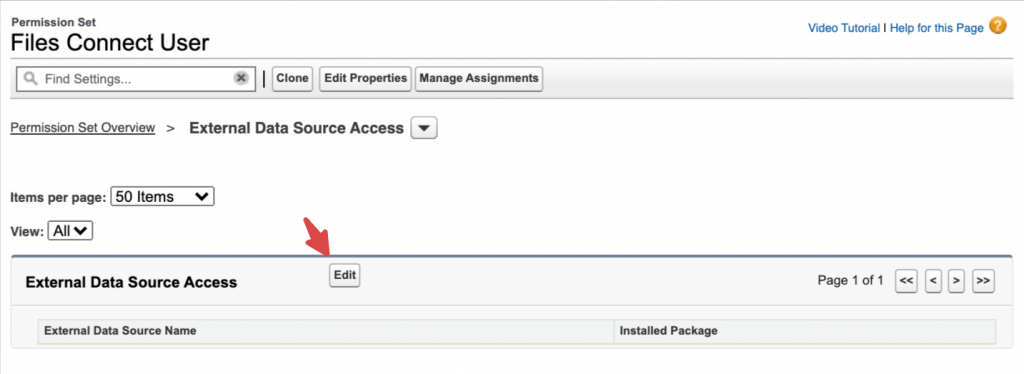
Select the external data source you just created and click the Add button to enable it for use with this permission set. If you don't see your external data source on this screen, you may need to go back and check your work in previous steps. When you're done, click Save.
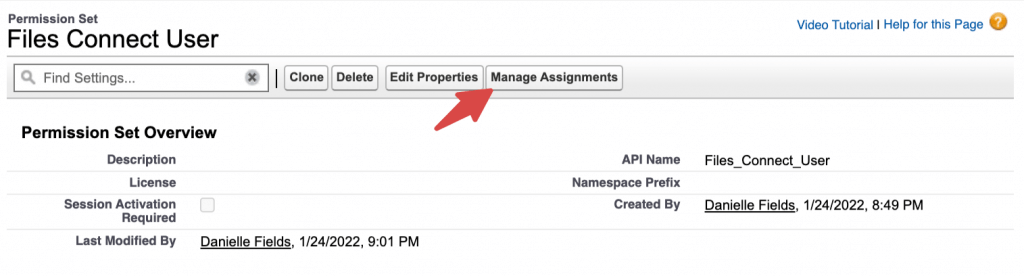
Finally, click Manage Assignments on your permission set's detail page to grant access to the appropriate users.
Managing Files Connect Access with Profiles
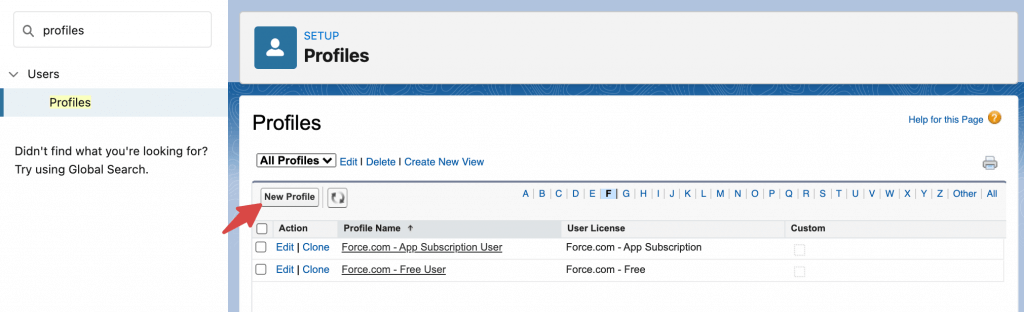
Managing Files Connect access with Profiles is a similar process. Find Profiles in the Quick Find bar and either create a new profile or, more likely, select an existing one to add Files Connect access to.
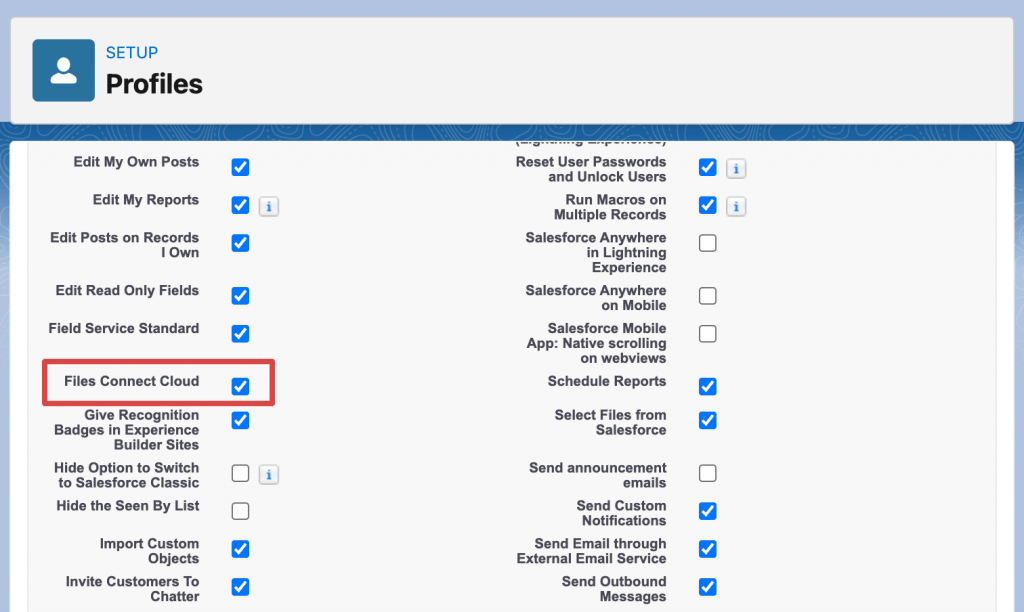
Click Edit next to your selected profile and scroll down to the Administrative Permissions section of its settings panel. Select Files Connect Cloud and click Save.
At the top of your profile detail page, select Enabled External Data Source Access and click Edit to select from your org's available external data sources.
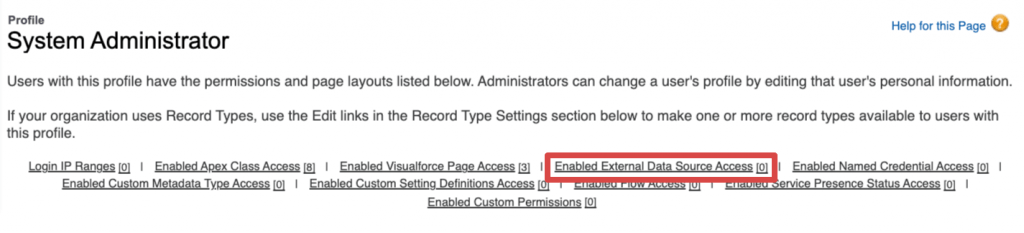
Choose the external data source you just created and click the Add button to enable it for use with this profile. Click Save to complete the process.

System administrators can assign this profile to users by editing their individual user settings.
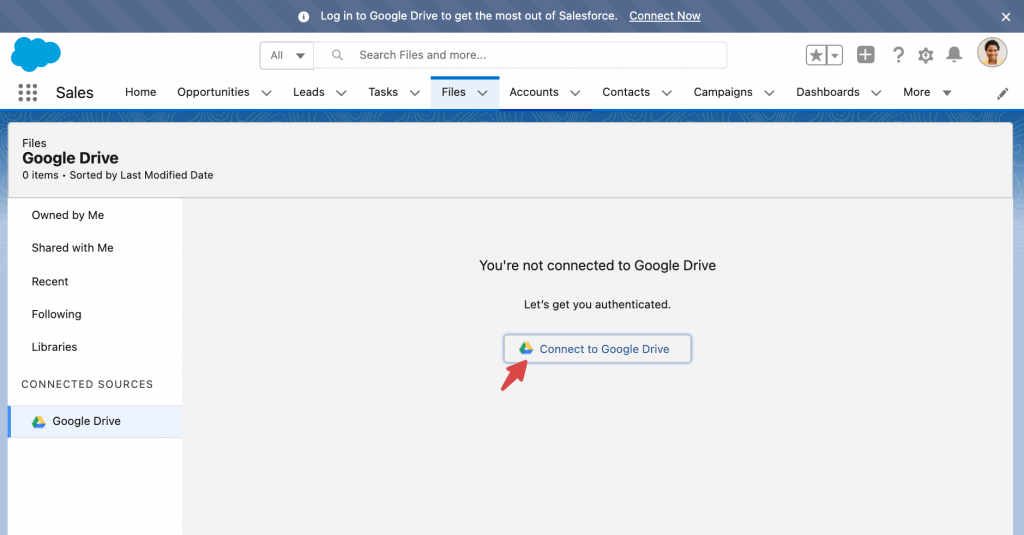
Connecting to Google Drive from Salesforce Files
Head over to the Files tab in your Salesforce org. If you've done everything right, Google Drive will appear under Connected Sources in the Files navigation sidebar. At this point, Salesforce will prompt you to connect to your Google Drive account.
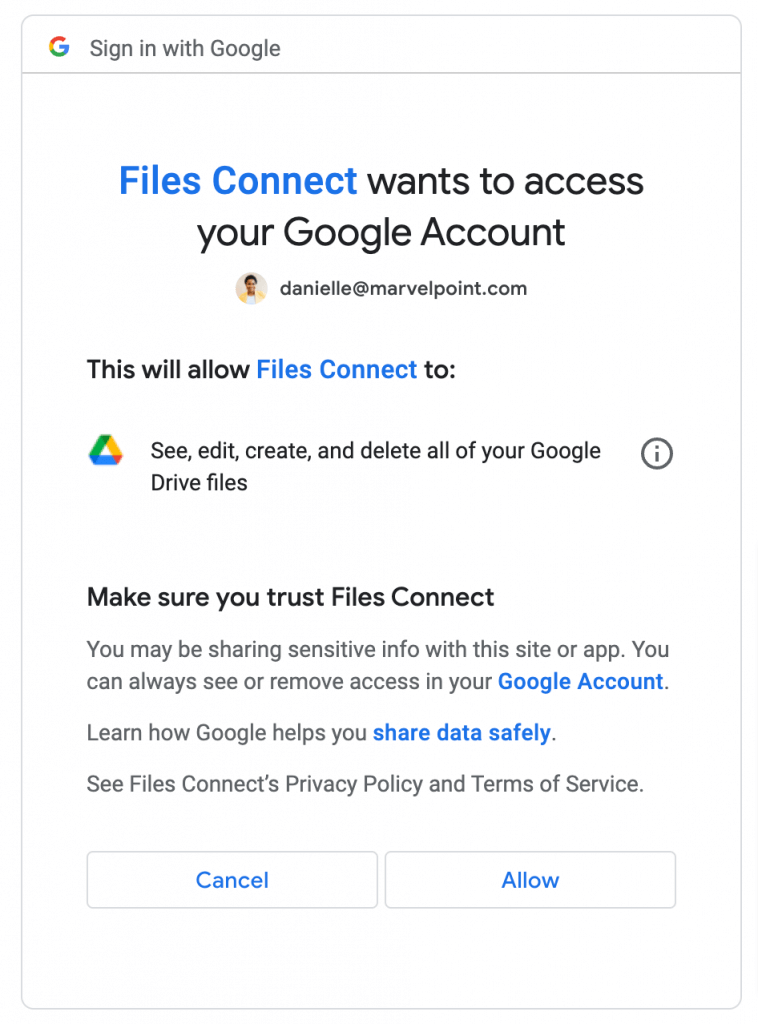
If you've ever signed in to a third-party website with your Google account, this process will look very familiar. Select your account and click Allow to grant Salesforce access to your Google Drive files.
When you're done, your Drive files will appear alongside your existing Salesforce files under Google Drive in the Files tab.
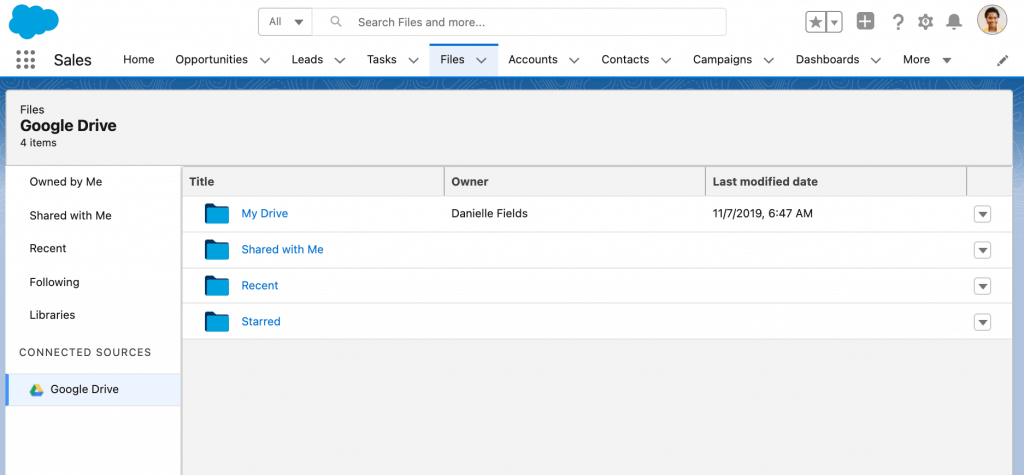
These files will behave like native Salesforce files, so you'll be able to view, share, and search for them the way you would with any other Salesforce document.
If you're actually using this guide to set up Files Connect, pat yourself on the back – you're all done! But if you're just trying to figure out how hard it'll be to get things up and running, you may be wondering whether all this is worth it. Again, let's review some of the limitations of Files Connect for Google Drive users:
- No compatibility with Shared Drives – Files Connect does not allow you to access files stored in Shared Drives
- Lack of consistency with the Google Drive environment – Google Drive files stored in Salesforce via Copy have a life of their own, with different security settings than the originals that live in Drive.
- No ability to add files to Google Drive from within Salesforce – If you want to add a new item to your Drive files stored in Salesforce, you'll need to head over to Google.
For many organizations, these limitations won't be a major hurdle, and Files Connect will work just fine. But if all your business documents live in Google Drive, and particularly if your organization is dependent on Shared Drives for collaboration, Files Connect may not be the tool best suited to your needs.
If you're a Google Drive power user looking for a more versatile solution, good news – we've got one for you.
Try Drive Connect for Free
You can use the app for 14 days with no credit card required.