
Creating automated processes within Salesforce is a huge part of streamlining your workflow and ensuring essential tasks in your org are performed consistently. And if looking to automate processes based on specific timing rather than direct interactions with records, Scheduled Trigger Flows are the way to go. In this post, we're diving deep into a Salesforce Scheduled Flow, exploring its definition, advantages, and a general use case to help you build your own Scheduled Flows.
What is a Salesforce Scheduled Flow?
Scheduled Trigger Flows are set to run at designated times, allowing for a wide array of use cases such as sending reminder emails, updating records on a regular basis, and scheduling tasks. Early Salesforce users may remember Time-based workflows, but transitioning to scheduled flows allows for more complex conditions and actions. So let's explore how to build a scheduled Flow in Salesforce. For this example, we’ll be configuring a scheduled flow to create a task reminding us to send a personalized email to an Opportunity one week after they've been added to our org.

Create a Scheduled Flow in Salesforce
Configuring the Trigger
- Navigate to Setup.
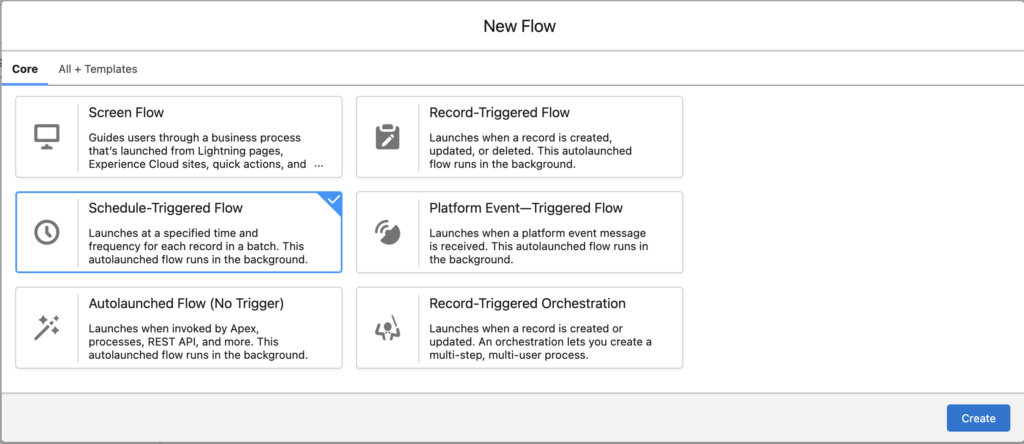
- In the search box, type “flows” and go to the Flow page. Choose New Flow in the top right corner.
- We will create a Schedule-Triggered Flow, meaning that the flow with run when certain time-based criteria are met.
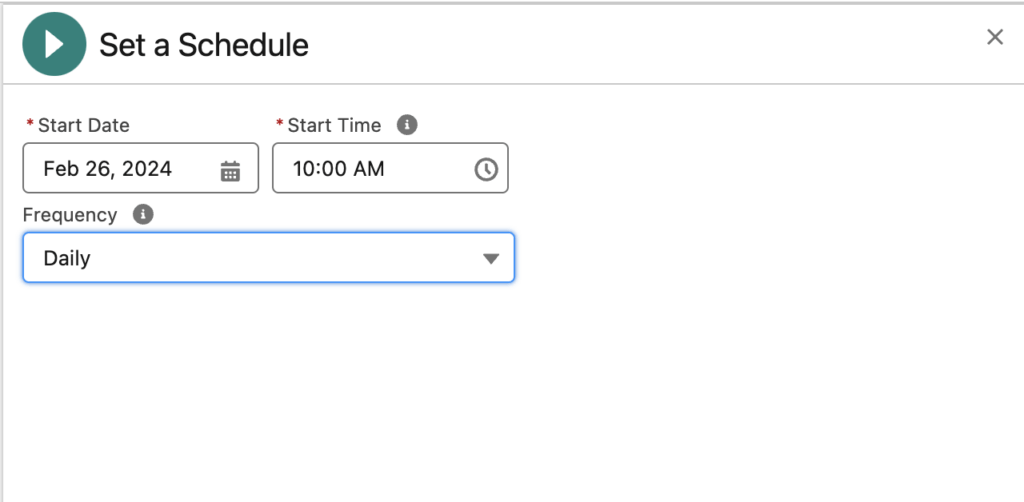
- Set the start date and time for your flow.
- Select the frequency for your flow. For this example, we will select Daily. This means the Flow will check to run every day.
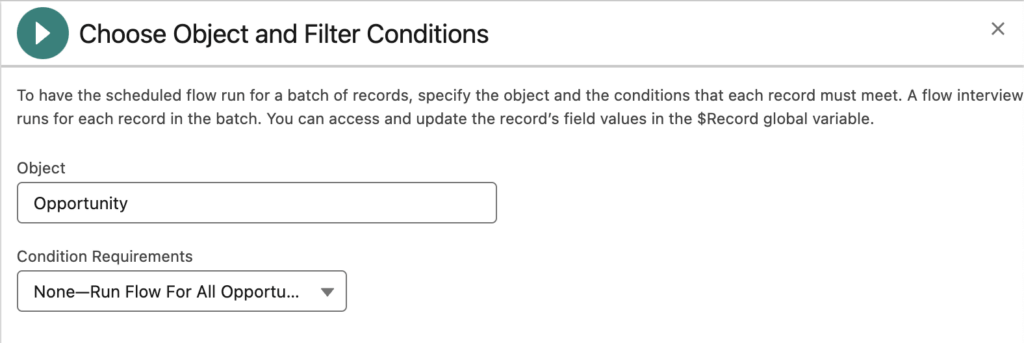
- Select the object you want to create the task for. Our example will use an Opportunity.
- Because we’ll be adding decisions later, for the Condition Requirements, we will select None- Run Flow for all Opportunities.
Adding a Current Date Formula to the Flow.
Next, we will create a formula so the Flow can register which day it's running.
- Click on the Toolbox in the upper left corner and select New Resource.

- From the Resource Type dropdown menu, select Formula
- We’ll name this “CurrentDate”.
- For Data Type, select Date
- Insert a resource and select $Flow, followed by CurrentDate.

Putting Date Formulas into the Flow
This formula calculates a period of one week following the creation of an Opportunity, enabling our task to reference this timeframe. This ensures our outreach is timely and consistent.
- Select Formula from the Resource type dropdown menu.
- We’ll name this “OneWeekAfterCreation”
- For Data Type, select Date
- Insert a resource and select $Record, followed by CreatedDate.
- Because we want the task to remind us when it's seven days after the, we are going to add a +7 to the end of our formula.

Adding a Decision to the Flow
Incorporating a decision element into the flow ensures it only triggers for Opportunities created after the flow itself was established. This means that existing and open Opportunities prior to the flow's creation won't be affected.
- Directly under the start of our Flow, click the (+) and insert a Decision.

- We’ll label this Decision “Yes” because it will be fo
- Under Outcome, select All Conditions Are Met (AND)
- From Resource, select $Record, followed by CreatedDate.
- Set the Operator as Equals.
- Set the Value as CurrentDate (aka the formula we created in part 2).

- Back on the Flow, under Default Outcome, click the (+) and select End. This ensures that if the created date of an opportunity is before we created this Flow, nothing will happen.
Creating Tasks with a Scheduled Flow
Finally, we'll set up a task to appear on the Opportunity record, while every organization has unique practices for task appearance, for the purposes of this example, we'll employ static text as a reminder.
- From the Flow, under outcome one, in this case, titled Yes, click the (+) and select CreateRecords.

- Under How to Set the Record Fields, select Use separate resources, and literal values
- We’ll name this task “Personalized Follow Up”.
- Under Set Field Values for the Task, we will set our first field as WhatId, and for its value, select $Record and Id.
- Let’s set our next field as Subject, and for its value, enter Personalized Email.
- Let’s set our final field as ActivityDate, and for its value, select our OneWeekAfterCreation formula.

How to Test a Scheduled Flow
Because the Scheduled Flow interview runs for each record in a batch, you’ll have to enter an Opportunity ID at the beginning of the Flow to test it in debug mode. This ensures you can test the flow without having to wait for the allotted number of days you scheduled.
- Go into an opportunity record, and in your browser's UR, find the Opportunity ID starting with “006”
- Highlight and copy

- Go back to your flow, and under the opportunity object at the Start, change the conditions to All Conditions Are Met (AND)
- Set the field as Id, and the operator as equals, then paste your Opportunity ID into the Value.

- Now you can Save and Debug your flow. After it runs, return to your opportunity object, and you'll see the task has been created.
Conclusion
In wrapping up our exploration of Scheduled Trigger Flows in Salesforce, it's clear to see how powerful these automation tools are. By harnessing the capability to execute tasks at predetermined times, Salesforce users can ensure their operations run smoothly and efficiently. For those looking to delve deeper into the world of Salesforce automation, Check out our other blog posts about assigning permission sets and sending emails using flow!
Make The Most With Salesforce Flow
Schedule-triggered flows just scratch the surface of automation within Salesforce. If you want to explore more with automation, check out Drive Connect– The easy-to-use Google Drive and Salesforce integration that lets you take automation to the next level with automated folder structure and document generation. It installs in just a few minutes, and you can try it free for 14 days with no credit card required. To learn more about integrating Google Drive and Salesforce, check out our Help Center.
Streamline your workflow with Drive Connect
Try Drive Connect free for 14 days- no credit card required.